News
[Blog] How-to Encode using Matroska In/Out with FFmpeg
Hello everyone!
We've added a new guide on how to add encoding to a stream using stream processes and FFmpeg. We're planning on adding a Gstreamer version as well as we can't be playing favorites.
Encoding is something that is often requested and hopefully this guide will help explaining how to set it up within MistServer. Just keep in mind that your encoding possibilities very much depend on your own server resources!
If you have any questions or wonder how to set something up specifically feel free to contact us
[Blog] Pushing WebRTC WHIP into MistServer using OBS
Hey everyone,
We've been quite busy with setting up the 3.4 release, now that we're done we'll start releasing more articles and how to guides. The first one up is how to push WebRTC WHIP into MistServer using OBS. It's already available in our online documentation right here.
[Blog] Deepdive into using RIST
What is the goal of this article
RIST (Reliable Internet Stream Transport) is an error correction protocol that ensures accurate transport of media streams across the public Internet. It is still a fairly recent standard, but now mature, and in daily use by media streamers even at the broadcast network level.
This article will explain the mechanics of RIST and give you some best practices/tips to get started. There is a widely available FOSS (Free and Open Source Software) implementation of RIST, called libRIST, and we shall refer to it here.
Do note that this will be written from a usage standpoint to keep things as easy accesible as possible, and in particular, to help the MistServer user implement this error correction protocol. Purely technical reasons as to why technique “X” would make something better than “Y” is a deeper dive than intended for this article.
What is the RIST standard?
A big benefit to RIST is that several companies, organized through the Video Services Foundation, maintain the spec. Some of the most noted experts in packet recovery contributed their knowledge and helped design the standard. One of the design goals is interoperability. A RIST implementation by “Company 1” is meant to be interoperable with another implemenation by “Company 2.”
When would you use RIST?
The biggest reason to use RIST is to move stream data over a lossy packet network; you know, like the Internet! Lab testing shows accurate playback across very extreme conditions, such as 50% packet loss. What you call a “bad hair” day over your Internet connection is probably a 1% loss. In fact, even the best corporate connections drop at least a few packets every hour, so an error correction protocol for important streams can benefit every user.
Right now, most RIST streams run between RIST servers, for transport from a source encoder to a media server which then distributes the stream in some other format such as HLS/DASH. In fact, end-user players such as VideoLAN’s vlc can already directly play a RIST stream! So if you’ve decided the time to familiarize yourself with RIST is now, you may be making exactly the right move!
Quality and reliability
RIST has the first obvious use case to deal with "bad network conditions". So when your connection from source to server or even between servers is expected to be weak you'll most likely be interested in RIST. Simply put, RIST saveguards the stream quality that goes through the connection and provides UDP transport that extra reliability layer that it's otherwise missing.
Latency
Simply putting an extra layer on top of the bits for delivery can adds latency, so surely RIST is added delay? Yes. It’s a trade-off.
Let’s explain how RIST works. The server receives a packet of media from the source, adds a sequence number and/or time stamp, and sends it off to the client. The server places a copy of the packet in a buffer. The client receives the packet… and the next packet, and the next, and so forth. But the client doesn’t immediately release each packet. The packets go into a buffer.
By examining the sequence numbers of the packets in the buffer, the client can send a re-request to the server if it finds a packet is missing or corrupted. The server then resends that packet. Once the client knows it has all the packets, it can then release the video stream to wherever it’s supposed to go.
As you can see, this means that you’ll want a buffer of at least three times the duration that it takes a packet to travel from server to client, or vice versa, plus a small amount to time for handling, or to wait and see if the original packet will arrive out of order, which sometimes happens on the Internet. If it’s a good RIST implementation, then the software will intermittently measure the “ping” time between server and client, and adjust the buffer time to be as short as possible, while also being efficient. Note also that RIST allows for time stamps (not all media formats include them). This allows for the client at the destination side to emit the stream at exactly the same speed that it was received at the source side by the server. The end result should be no (or very, very few) dropped packets, and no jitter. You may have read about humorous implentations of IP networks using carrier pigeons to transport packets; RIST would theoretically carry video over pigeon-Internet, though it might require a lot of tired pigeons!
The bottom line for a media provider is that at the cost of a latency of, for example, half-a-second to a few seconds, your streams will be flawlessly transported.
Security
RIST does allow you to make a secure AES-encrypted tunnel from point-to-point distribution, or even point-to-many-point distribution, using either pre-shared key, rotating-keys and an optional authorization protocol based upon existing protocols, and currently submitted as an Internet RFC (Request for Comment).
What does RIST do differently compared to SRT?
The current leader in the field of error correction transport is Haivision SRT (Secure Reliable Transport). In fact, SRT and RIST provide similar functions. Some of the companies and engineers who designed RIST also sell implementations of SRT. But you could point to some differences in approach:
SRT tends to focus on professional installations. Engineers at a given location expect a known or constant latency between source and destination, and that is usually the starting point in the configuration of the link. Note that while there is a free implementation of SRT, large customers generally use non-free versions.
RIST, depending upon the implementation, can dynamically set and modify the buffer in accordance with changes in network conditions. This sometimes means that from start of receiving the stream to viewing it may take longer. The buffer’s size is being determined and the buffer filled. It also, generally, means a lesser overhead (in CPU processing and average bandwidth per connection).
Note also that while there are paid versions available, a free version, libRIST, is already extensively used by at least one of the big three U.S. broadcast networks. libRIST also provides a very flexible license so that developers can easily incorporate it into their own, free or non-free projects.
RIST and MistServer
There’s one very big reason to choose RIST when using MistServer: RIST is able to provide a buffer window, which is incompatible with most other applications. MistServer, however, can handle this just fine. We’ll obviously have to document this for you elsewhere! The benefit is that when you use RIST with MistServer, your latency/quality balance can actually adapt to your current connection. Most connections only do this at the start if at all.
What are the RIST profiles
Profiles are specified “flavors” of RIST. Each successive profile implements the features of the previous and adds additional features beyond the previous.
Simple (Released in October 2018)
The first and most common implementation of RIST. The core of the Simple profile is to just get the error corrected transport going and optimize for quality/latency. Note that RIST Simple profile require two ports, with the first an even number. Encryption is supported externally (DTLS). Stream types must be RTP or UDP.
Main (Released in March 2020)
The second profile specification released. It adds support for encryption with AES, has an optional authorization process, and supports point-to-multipoint services (or vice versa). It also supports multi-path routing, allowing for load balanced (for redundancy) or split (for speed) paths using two Internet service providers on the source side. It provides for GRE tunneling, thus supporting multi-plexing of streams and compatibility for any type of stream format. It also makes it easier for different sides to “initiate” the connection vs. the start-of-stream. This makes it very useful when one side or the other is behind a firewall.
Advanced (Released in October 2021)
This profile supports additional tunneling capabilities (effectively providing VPN-like services) and realtime LZO compression (which is surprisingly effective for very high density streams, or for WebRTC)!
When do you choose which profile?
In testing start with Simple profile and work your way up. In production, if you’re not too concerned with security, then Simple will do. It’s more likely, however, you’ll use Main profile.
Usage quickstart guide
If you start with libRIST, you may wish to first try a libRIST to libRIST connection. There is a step-by-step guide with command line examples and explanations.
The rest of this article’s quickstart will focus upon MistServer and libRIST. MistServer (3.0 and higher) incorporates libRIST code for their RIST implementation.
Note that RIST implementation in Mistserver up to version 3.2 requires compiling your own version of MistServer. RIST is fully included in 3.2 and every release after.
All you need to do to use rist is provide MistServer a source or push target starting with rist://. libRIST’s quick start and documentation explain the URLs thoroughly! A rist:// URL can incorporate multiple sources or targets as well as multiple streams, each with different parameters! Start small, and work your way up!
Another thing to keep in mind is that the stream buffer within MistServer also determines how much should be sent to the other side when connection is made. So keeping that low or high depending on your goal may help as well.
Understanding the RIST defaults
The default RIST values for MistServer are compatible with libRIST and will work well for most networks and other application targets by default. We always recommend changing settings to fit your needs, but the defaults are a great starting point.
The defaults are made to work with networks fitting within:
- Buffer sizes from 50 ms to 30 seconds
- Networks with round trip times from 0ms to 5000ms
- Bitrates from 0 to 1 Gbps
- Packet size should be kept under the path's MTU (typically 1500). The library does not support packet fragmentation.
- Bi-directional networks (not one-way satellite systems, though Advanced profile and other updates to the RIST specification are in progress).
Usage
When used with MistServer, RIST creates the connection between two points. An input must connect with an output. In order to match the connection an address and port is needed.
You will sometimes see a rist:// URL in which an @ character precedes an IP address/port (as in @192.168.1.1:12345; IPv6 is also supported by the way). This applies to an IP on your host, and signifies that your host is to be in listening mode: it waits for the other side to contact it to establish the connection. Without an @ character, it means, just start sending to (or receiving from) at that address/port.
MistServer using a RIST stream as input
The MistServer input will listen at an address/port (or on all interfaces through 0.0.0.0 if not set). This assumes the source sends to the specified input address. Note that multicast is supported, with the device name being a parameter.
Syntax:
rist://@(address):port(?parameter1=value¶meter2=value...)
@: This signifies that the MistServer host will wait for an incoming RIST connection.address: Optional for input side, if given it will listen on that specific address, if unset it will listen on all addresses.port: UDP port to useparameters: Additional options you can set, see below for all available parameters.
MistServer sending a RIST stream to a location
The MistServer will reach out to the given address and start sending a stream towards it using RIST transport. It assumes the other side listens for it.
Syntax:
rist://adderss:port(?parameter1=value¶meter2=value...)
address: Must be set for output side, the address to connect towards.port: UDP port to useparameters: Additional options you can set, see below for all available parameters
Common pitfalls/mistakes
Mismatched Parameters
The most common mistake is mismatched parameters. If, for example, the sender encrypts at AES 128, and the receiver at AES 252, transport will not be possible.
Simple Protocol Port Assignments
As mentioned previously, Simple Protocol uses two ports, and the first one must be an even number. Currently MistServer will enforce you to use even ports just in case. So an error message that you should pick an even port will come up regardless of profile!
Routing and Firewalls
Where possible use ping and tracert to verify each side and reach the other. You can also search the web for articles regarding UDP pings – they can be done using nmap or netcat, and can help you verify that a path to the precise port you wish to use is open.
Parameters aren’t working
Note that libRIST has a verbosity setting which is extremely useful in debugging what might be the cause.
How do You “Tune” Your Connection for:
Latency and Efficiency
You can trust the latest versions of libRIST and MistServer to negotiate and auto-configure the best latency values for efficiency and reliability. But we encourage you, especially if you’re doing this for the first time, to understand manual setup as well.
Also, when you expect major transport problems, you may wish to “tune” your settings for a specific connection. Or if you’re MistServer installation is not quite up-to date, you may also wish to manually configure.
You’ll find that MistServer works best with a dynamic buffer size for its RIST connection. The buffer-min and buffer-max. Parameters set the absolute smallest and largest amounts in milliseconds that your buffer shall use. The example below sets very small and large values.
Example:
rist://address:port?buffer-min=10&buffer-max=1000
When RIST starts, it UDP-pings the other side to measure the round trip time. RIST then sets the initial buffer to six times the RTT whenever you manually set the buffer-min and buffer-max. Thereafter, by monitoring pings between the server and client, RIST can shrink or enlarge the buffer to the min or max, based upon network conditions. The “viewer” of the stream sees a constant playback because RIST has previously enlarged the buffer at the first sign of network problems.
RTT-min and RTT-max are related parameters. Their primary use is to “signal” to the RIST algoritms that there may be either a very good network or very bad network condition ahead, based upon the difference between the min and max. In testing, ping the other side about 100 times (ping -c 100), or at different times of day. Make a note of the minimum and maximum values in milliseconds, and substitute the values in the example below:
Example:
rist://address:port?buffer-min=10&buffer-max=1000&rtt-min=rtt_min_from_ping&rtt-max=8xrtt_max_from_ping
This would tell libRIST to calculate the lowest latency and best quality sweet spot between 10ms and 1000ms and keep doing this for as long as the connection is busy. RIST will shrink or enlarge the buffer as network conditions change.
In general, you’ll use buffer-min and max when you’re guessing at network quality, and rtt-min and max when you can actually test the network quality. Another thing you can do is change the MistServer default buffer size from 50000 to a lower amount, 10000 for example. Do note that MistServer will make this buffer higher if it’s needed to output certain protocols like HLS.
Note: MistServer RIST defaults
MistServer, its built in RIST transport defaults to:
buffer-min: 1000msbuffer-max: 1000msrtt-min: 50rtt-max: 500
You’ll be using the defaults automatically by simply by filling in the bare minimum:
rist://(@)address:port
URL Parameter List
Note that if you use libRIST, you may see help text with rist-sender --help, ristsender –help-url, plus the same for ristreceiver. We might also note here that if you have multiple MistServers set up at multiple points-of-presence, libRIST includes a third binary (rist2rist) which acts a “switching point” that can “distribute” from your original source to multiple RIST receivers without having to decode/re-encode the stream.
For every parameter below we’ll have it set with its default as used in MistServer:
Simple, Main and Advanced profile
buffer=1000
Default 1000ms. (both min/max), the buffer by which stream data could be delayed between in and out (jitter is compensated for).
bandwidth=100000
Default 100000 Kbps. Sets the maximum bandwidth in Kbps for the connection. Measure your stream bitrate and recommended to use 10% higher for a constant bitrate, 100% higher for variable bitrate.
return-bandwidth=0
Default 0 Kbps (no limit). Sets the maximum bandwidth from receiver to sender (communication of re-requests, pings, metrics) in Kbps.
reorder-buffer=25
Default 25ms. Sets a secondary buffer in ms to reorder any out-of-order packets. Usually not necessary to change.
rtt=0
Default (not set). The RTT (in ms) determines the time between requests and makes sure the spacing between them fits the network conditions. Setting this value sets both the rtt-min/max to the same value, which is not recommended.
cname=
Default 0 (not set). Arbitrary name for stream for display in logging. For MistServer the stream name will be copied in here if possible.
weight=5
Default 5. Relative share for load balanced connections, distribution paths will be determined by the weight in comparison to other weights. Use 0 for multi-path.
buffer-min=1000
By default equal to buffer in ms. Determines the shortest the buffer is allowed to be.
buffer-max=1000
By default equal to buffer in ms. Determines the longest the buffer is allowed to be.
rtt-min=50
Default 50ms, the RTT will not search below this value. Will set itself to 3ms if you try to set it lower.
rtt-max=500
Default 500ms, the RTT will not search above this value. Will overwrite rtt-min.
timing-mode=0
0 = RTP Timestamp (default); 1 = Arrival Time, 2 = RTP/RTCP Timestamp+NTP.
The RIST specification does not mandate time synchronization. Using this parameter, librist shall attempt to release the packets according to the time stamp indicated by the option specified. When not set, it emits the media packets at a speed equal to that at which the packet was received at the sender side plus the time buffered. Note that the Network Time Protocol option is designed so that you can synchronize playback of multiplexed streams using ntp plus the buffer size as a guide. The allowed values are1, for Arrival Time and 2, for RTP/RTCP Timestamp plus NTP. Note that this different than the RTP-timestamp=# and the RTP-sequence=# URL parameters in that the latter two will not attempt to synchronize the release of the packets to the player.
virt-dst-port=1968
Default 1968. the port within the GRE (Generic Routing Encapsulation) tunnel. This has nothing to do with the media port(s). Assume the GRE is device /dev/tun11, having an address of 1.1.1.2, and you set the virtual destination port to 10000 and your media is using port 8193/4. The operating system will use 1.1.1.2:10000 for the GRE. As far as your media source and media player are concerned, the media is on ports 8193/4 on their respective interfaces. The media knows nothing of the tunnel.
profile=1
0 = Simple, 1 = Main, 2 = Advanced
Default main. Rist profile in use.
verbose-level=6
Disable -1; Error 3, Warning 4, Notice 5, Info 6, Debug 7, simulation/dry-run 100
Default level is 6. Allows you to set the verbosity of the RIST protocol, 100 is used to do a simulation/dry run of the connection. High and Advanced only
High and Advanced only
aes-type=#
128 = AES-128, 256 = AES-256,
Specifies the specific encrytion. Specify “128” for AES-128 or “256” for AES-256. Remember that you must also specify the pass phrase. Both sides must match the passphrase (“secret” parameter).
secret=
The encryption passphrase that must match on both sides. Requires an aes-type to be set.
session-timeout=2000
Default 2000 in ms. terminates the RIST connection after inactivity/lack of keepalive response for the limit (in milliseconds) which you set with this parameter.
keepalive-interval=1000
Default 1000 in ms. Time in milliseconds between pings. As is standard practice for GRE tunnels, the keep alive helps ensure the tunnel remains connected and open should no media be traversing it at a given time.
key-rotation=1
Default 1ms. sets the key rotation period in milliseconds when aes and a passphrases are specified.
congestion-control=1
Default 1.
mitigation mode: (0=disabled, 1=normal, 2=aggressive)
libRIST provides built in congestion control, which is important in situations in which a sender drops off the connection, but the receiver still sends re-requests. The three options for this parameter are 0=disabled, 1=normal and 2=aggressive. In general, don’t set the parameter to “aggressive” unless you’ve definitely established that congestion is a problem.
min-retries=6
Default 6. sets a minimum number of re-requests for a lost packet before congestion control kicks in. Note that setting this too high can lead to congestion. Regardless of this setting, the size of the buffer and the roundtrip time will render too high a minimum value here irrelevant.
max-retries=20
Default 20. sets a maximum number of re-requests for a lost packet.
weight=5
Default 5 Relative weight for multi-path load balancing. Use 0 for duplicate paths.
username=
this corresponds to the srp-auth credentials defined (globally) on the “other” side, when the “other” side is in listen mode with an srp-auth file holding the corresponding credentials. Note that libRIST includes a password utility. If you’re familiar with Apache’s htpasswd, it works just like that.
password=
this corresponds to the srp-auth credentials defined (globally) on the “other” side, when the “other” side is in listen mode with an srp-auth file holding the corresponding credentials.
multiplex-mode=-1
Controls how rist payload is muxed/demuxed (-1=auto-detect, 0=rist/raw, 1=vrtsrcport, 2=ipv4)
multiplex-filter=#
When using mux-mode=ipv4, this is the string to be used for data filter. It should be written as destination IP:PORT
Advanced Profile only
compression=1
1 for enable, 0 for disable
enable lz4 levels
Usage: append to end of individual udp:// or rtp:// url(s) as ?param1=value1¶m2=value2…
miface=
The device name to multicast on (e.g. eth0), if unset uses the system default.
stream-id=
ID number (arbitrary) for multiplex/demultiplexing steam in peer connector.
rtp-timestamp=0
carry over the timestamp to/from the RTP header into/from rist (0 or 1).
rtp-sequence=0
carry over the sequence number to/from the RTP header into/from rist (0 or 1).
rtp-ptype=#
override the default RTP PTYPE to this value. RFC 3551 describes the standard types.
[Blog] Setting up Analytics with VictoriaMetrics and Grafana
In this post we will cover installing VictoriaMetrics and Grafana and setting them up. We will also cover upgrading your Prometheus setup to Victoriametrics in case you are looking to update.
Why do I want Victoriametrics and Grafana for analytics?
MistServer has a tremendous amount of data available and in use to optimize streaming workflows with the sole intention of running in the moment. MistServer itself does not store this data anywhere as it would quickly flood your server storage. Data collection applications such as VictoriaMetrics are made to specifically counter this problem and are capable of scraping (collecting) the data and storing it with superior compression. Grafana in turn is an application made to make data like this what we call "human friendly". Providing graphs, bars and other visual representations of the data easy to understand.
Best practises for setting up your analytics server
As you might have guessed using VictoriaMetrics and Grafana will require some resources therefore we recommend running it on a different device than you are running MistServer on. This is for a few reasons, but the most important being that you would want your analytics collection to keep going if your MistServer instance goes dark for some reason or has run into trouble.
As such we would recommend setting up a server whose sole focus is to get the analytics from your MistServer instances. It can be any kind of server, just make sure it has access to all your MistServer instances.
Requirements
- One or more running MistServer instance(s)
- A server with connection to all MistServer instances you want to capture analytics from
The steps to follow
- First we will choose an operating system
- Then we will install VictoriaMetrics & Grafana
- Afterwards we will set up Grafana
- Lastly we will show some default MistServer dashboards for Grafana as a template
01 OS Selection
While VictoriaMetrics is able to run in nearly any OS and has docker images available as well our personal preference goes to running it on a dedicated Linux server. Linux allows us to throw a very minimal OS on the server and fully dedicated it to the task of data collection. Other OS tend to add unnecessary features and complicate usage.
If you do want to use a different OS please feel free to do so, with the exception of the actual installation process the rest of this guide should still help you set everything up.
02 Installing VictoriaMetrics and Grafana
VictoriaMetrics
VictoriaMetrics is wide-spread since its release in 2018. By now it's almost certainly in the default package managers for your Linux distro. If for some reason it is not we would recommend manually installing it using their available downloads.
Setting up VictoriaMetrics
Now before we start, obviously we cannot cover every setting available within VictoriaMetrics. We'll give something to work with. We would always recommend reading up on the applications you're using and determining what settings you want to use yourself as well.
We would recommend some minor tweaks to the boot arguments. The default retention period is 1 month. We will want to edit it to something longer, let's say 120 months.
Adding the following to the arguments list will do the trick:
-retentionPeriod 120
Now depending on how VictoriaMetrics is installed the arguments could be directly in your service script or link to an EnvironmentFile.
Another thing to consider is to change the path where the data is stored. While not strictly necessary we usually change it towards:
-storageDataPath /var/lib/victoriametrics/
Make sure that the user VictoriaMetrics runs as exists and has access to this folder.
Updating your Prometheus setup to VictoriaMetrics
If you're updating from Prometheus to VictoriaMetrics you can follow the set up above, but also need to do two more things. - Load in the existing prometheus.yml settings - Import the existing prometheus data
Loading in the existing prometheus.yml settings
The flag -promscrape.config handles this, however your existing prometheus.yml is most likely not compatible with VictoriaMetrics. Therefore we recommend the following:
- Copy your prometheus.yml to /etc/victoria.yml
- Edit the new victoria.yml to be compatible with VictoriaMetrics
- set the promscrape.config to victoria.yml
You can copy your current prometheus.yml with the following command:
cp /path/to/prometheus.yml /etc/victoria.yml
If you do not know where your prometheus.yml is run the following:
ps aux|grep prometheus
Within the output you should see a config file argument like:
--config.file /etc/prometheus.yml
That is where your prometheus.yml is located.
We will now edit this file, grab your preferred text editor and we'll start making it compatible. As bare minimal you only need the scrape config. So unless you absolutely want to keep a setting I would delete everything but the scrape config.
A minimal victoria.yml would look like this:
```
scrapeconfigs:
# The job name is added as a label job=<job_name> to any timeseries scraped from this config.
- jobname: "mist"
scrapeinterval: 10s
scrapetimeout: 10s
metricspath: '/PROMETHEUSPASSPHRASE'
static_configs:
- targets: ['SERVER01:4242', 'SERVER02:4242']
# metrics_path defaults to '/metrics'
# scheme defaults to 'http'.
```
Now go back to your VictoriaMetrics service script or EnvironmentFile and add the following line to the arguments:
-promscrape.config /etc/victoria.yml
Importing the existing prometheus data
We can now start VictoriaMetrics. If you've skipped the original set up for VictoriaMetrics keep in mind that you want to at least add -retentionPeriod 120 to the argument list. This makes the retention period 120 months instead of the default of 1 month.
Let's boot up VictoriaMetrics with the correct configurations
systemctl daemon-reload
systemctl restart victoriametrics
Take a coffee break of 5-10 minutes so VictoriaMetrics has had time to collect data while Prometheus is still active (to avoid data loss).
Go to your Grafana setup and change the Datasource to go to port 8428 instead of your Prometheus port (9090 by default).
VERIFY THIS IS WORKING
Open one of your Dashboards, set the window to 5 minutes to cover the "new" collection time and see if you're getting the stats you expect.
If you're seeing your dashboards work continue, if you're not getting anything start debugging why. I would start with systemctl status victoriametrics and continue from there.
We will now need vmctl if your VictoriaMetrics installation came without you can find vmctl at the VictoriaMetrics Download page under the vmutils packages.
Check where the Prometheus storage path is:
ps aux|grep prometheus
Look for the argument:
--storage.tsdb.path /path/to/prometheus/
Write this down, you will need it in a bit.
Close down prometheus:
systemctl stop prometheus
systemctl disable prometheus
and start the import:
vmctl prometheus --prom-snapshot /path/to/prometheus/
Take some time off as now you need to wait for the import to finish. Once it's done open your Dashboard again and you should see all your old data back. Congratulations, you've upgraded succesfully.
Grafana
Grafana is well distributed within the Linux community. You should be able to simply install it as a service using the default installation process for your chosen OS. If for some reason it is not available check for the Grafana website for installation instructions.
03: Setting up Grafana
Through your installation method Grafana should be active and available as a service. If not you can start it simply by booting the executable, but I would look into getting it ran as a service.
Once active Grafana will have an interface available at http://HOST:3000 by default. Open this in a browser and get started on setting up Grafana.
Adding a data source
The next step is to add a data source. As we're running Grafana and Prometheus in the same location, this is quite easy. All we need to set is the Name, Type and URL all other settings will be fine by default.
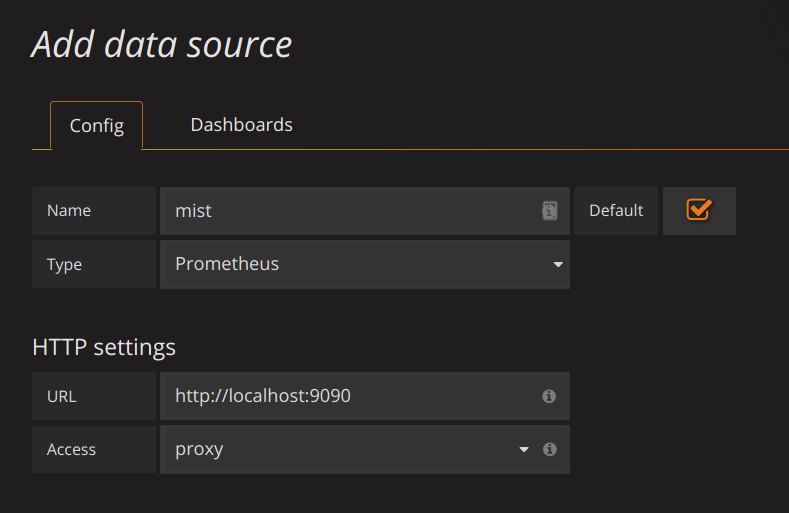
Namecan be anything you'd want.Typehas to be set to:Prometheus(yes, this is correct.)URLwill be the location of the VictoriaMetrics interface:http://localhost:8428
Add those and you're ready for the next step.
4. Adding the dashboard
We've got a few Dashboards available immediately which should give the most basic things you'd want. You can add a dashboard by following these steps:
Click on the grafana icon in the top left corner → hover Dashboards → Select Import
You should see the following
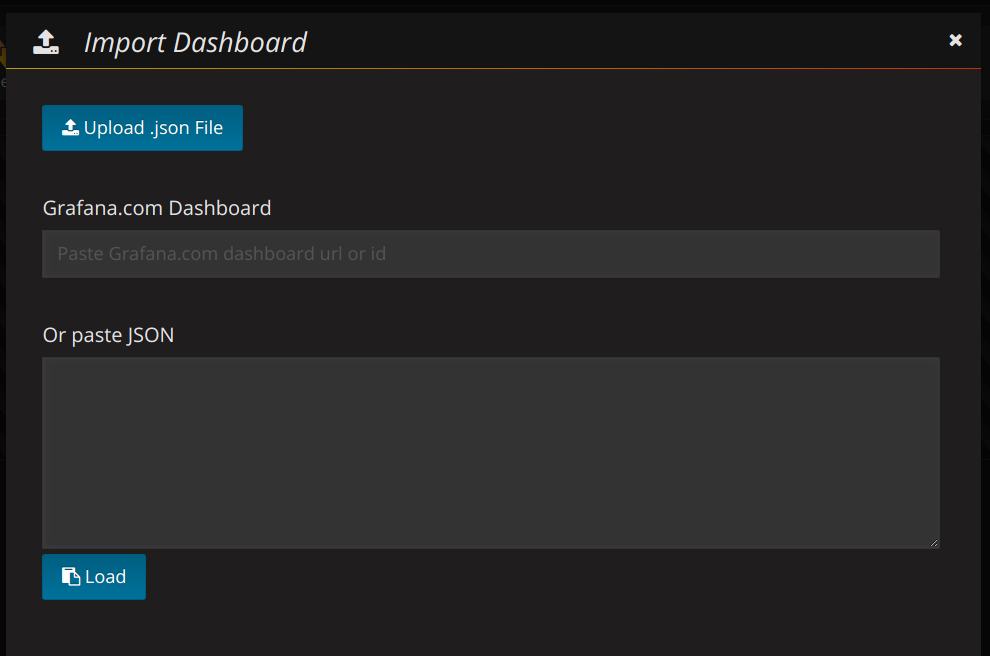
Fill in the Grafana.com Dashboard number with our preset dashboards (for example our MistServer Vitals: 1096)
If recognised you will see the following
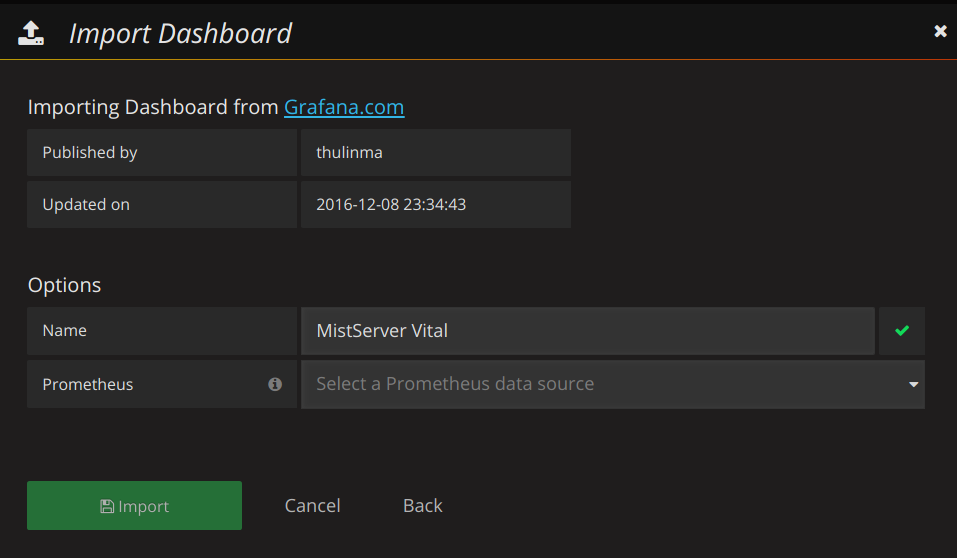
Just add that and you should have your first basic dashboard. Our other dashboards can be added in the same manner. More information about what each dashboard is for can be found below.
MistServer provided dashboards
All of the dashboards can be found here on Grafana Labs as well.
MistServer Vitals: 1096
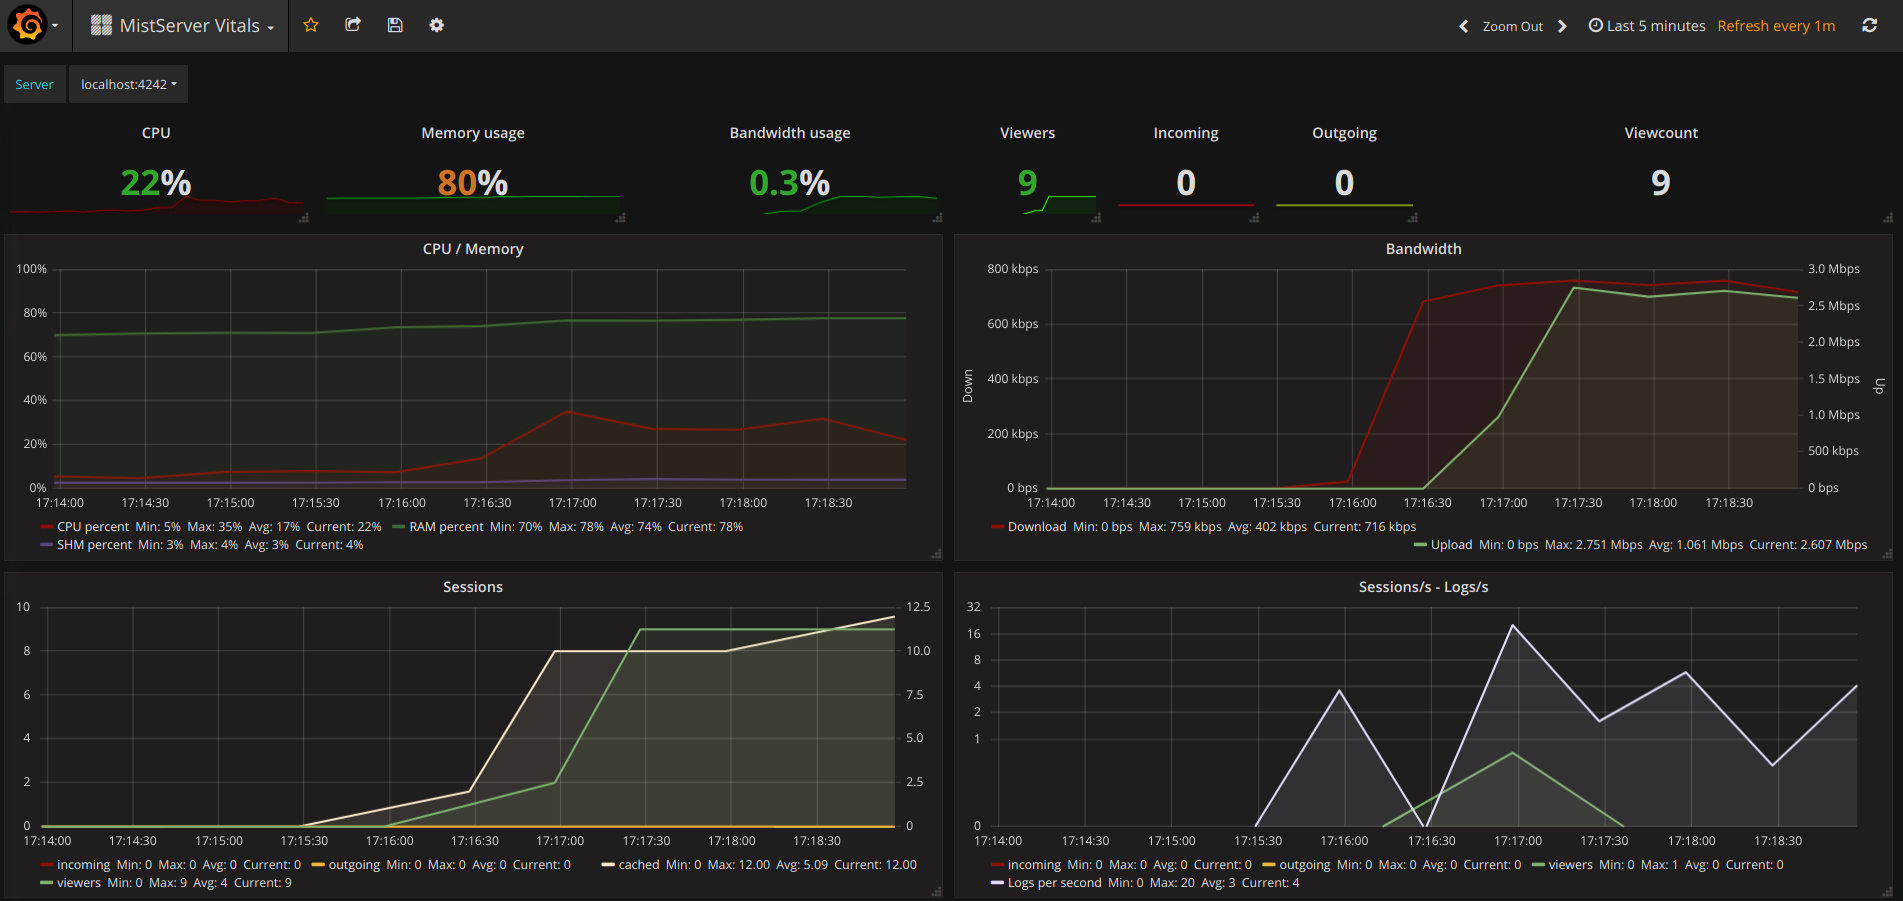
This is our most basic overview which includes pretty much all of the statistics you should want to see anyway. It covers how your server is doing resource and bandwidth wise.
You switch between given MistServers at the top of given panels by clicking and selecting the server you want to inspect.
MistServer Stream Details: 4526
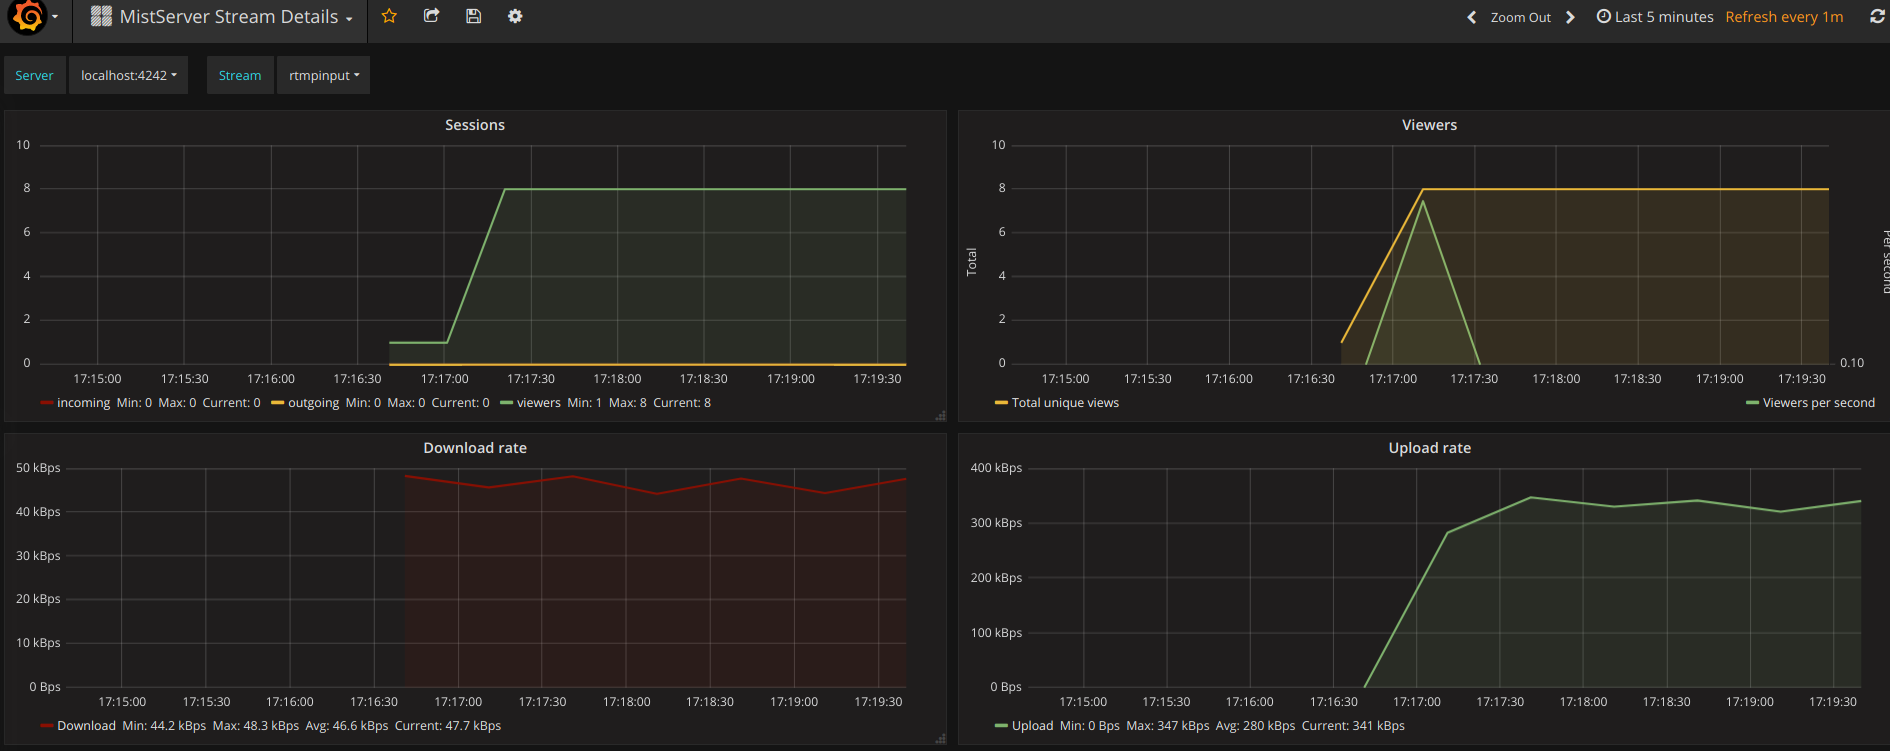
This shows generic details per active stream. Streams and Servers are selected at the top of the panel. You'll be able to see the amount of viewers, total bandwidth use and amount of log messages generated by the stream.
MistServer All Streams Details: 4529
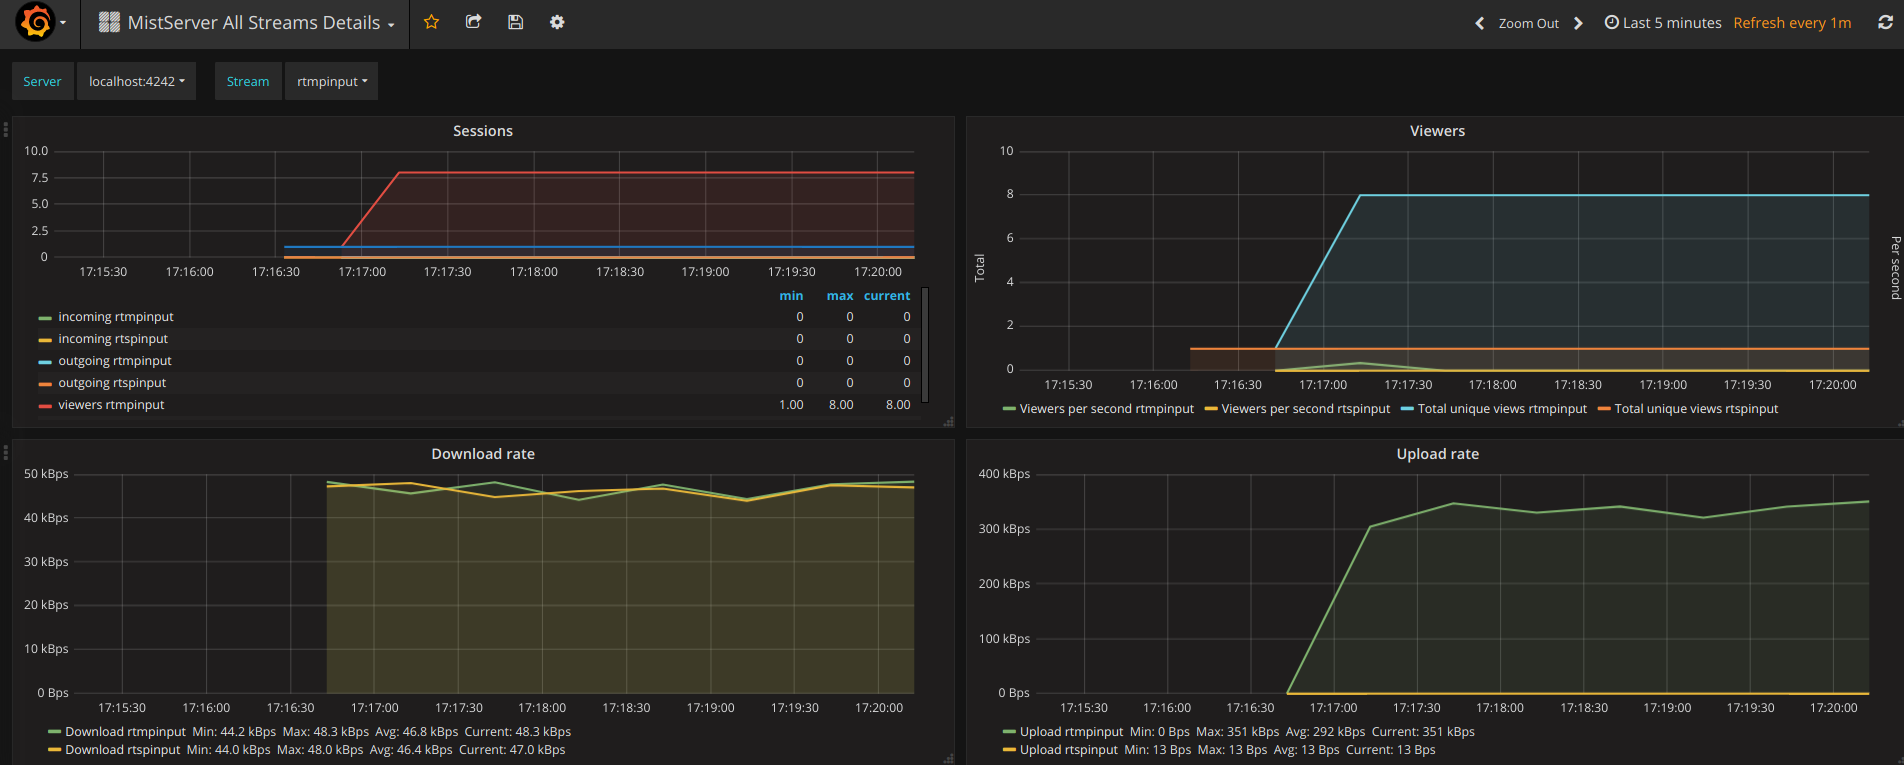
This shows the same details as the MistServer Stream Details Dashboard, but for all streams at the same time. This can be quite a lot of data, and will become unusable if you have a lot of streams. If you have a low amount of streams per server this gives an easy to use overview however.
[Blog] Simple token support for live streams
Hey everyone,
We've had quite some questions about how to use tokens with live streaming and decided to give another easy example. Do note that this wouldn't be a recommended way for larger platforms, but for something small or quick and dirty this will work and is pretty much done in 5 minutes. For a longer and proper explanation please look at this post.
What is live streaming with tokens
Live streaming with tokens allows you to give your streamers some security in their RTMP push url while at the same time allowing for a more user friendly stream name for viewers/channels. The default for RTMP is that the stream name returns in the push url. While handy this does open it up for people to "hijack" the stream as the push url is easily guessed.
Using tokens allows you to use complicated stream keys to push, while keeping the stream name within MistServer easy to use & user friendly. To get this done we will be using Triggers and a bash script.
Requirements
- MistServer 3.0+ on Linux
- Minor knowledge of Linux
Steps we go through in this guide
- 1 we will have a look at the bash script
- 2 we will look at the MistServer settings
- 3 we will be editing the bash script to your streams
- 4 we will be changing the push URLS for your pushing application for RTMP
- 5 we'll then look at what changes when we use SRT
- Finally we'll look at how this works for a wildcard setup
1. The bash script
#!/bin/bash

#log incoming data for debugging/logging. Uncomment below
#TRIGGERDIRECTORY="./"
#cat >> "${TRIGGERDIRECTORY}push_rewrite.log"

#Collect the trigger payload
DATA=`cat`

#Split up 2nd and 3rd line to IP and KEY given by trigger
IP=`echo "$DATA" | sed -n 2p`
KEY=`echo "$DATA" | sed -n 3p`

#variables to match with IP & KEY.
#PASS = KEY
#ORI = IP
#STREAM = Stream name to redirect towards
function checkStream {
        PASS=$1
        ORI=$2
        STREAM=$3

        if [ "$IP" = "$ORI" ]; then
                if [ "$KEY" = "$PASS" ]; then
                        echo -n "$STREAM"
                        exit 0
                fi
        fi
}

#checkstream fills in $1,$2,$3 with: "password" "IP" "stream_name" and checks info below for matches
#To add streams copy below checkStream and fill in pass/IP/stream_name to allow any IP use $IP
#checkStream "key" "$IP" "streamname"
Save the following text in your folder of preference under your preferred name. I would recommend saving it something easily recognizable like: push_rewrite.sh
After saving it don't forget to make it executable with the terminal command:
chmod +x file
2. MistServer settings
Stream Setting
Live streams will be set up normally, simply make a stream with any stream name and as source use:
push://
It does not matter how many live streams you set up, but do mind that every live stream needs to be set up later on in the bash script.
Trigger setting
This is where the magic happens. We will use a bash script below to rewrite the stream keys to their easier counterparts.
Use the trigger
PUSH_REWRITE
Handler (URL or executable): /path/to/bash.sh
Blocking: YES
Default response: false
The /path/to/bash.sh will be the path/filename you used when setting up the bash script.
3. Editing the bash script to your streams
Now all that is left will be editing the bash script to work with your live streams.
Generating stream tokens
Now this is something I highly recommend generating yourself, it can be pretty much as long as you like. To avoid annoyances I would also recommend avoiding special characters as some applications might not like those when pushing out an RTMP stream.
For this example I will be using md5sum. Keep in mind that the whole point of the token is that they cannot be easily guessed, so don't just only hash the stream name. Add something that only you know in front and behind the stream name to generate your token.
Example:
md5sum <<< supersecret1_live_supersecret2
This will give me the output:
8f4190132f1b6f1dfa3cf52b6c8ef102
Using the stream name in there will make the token generation different every time and the randomly chosen words before and after will keep it impossible to guess for outsiders. Use a token your comfortable with or you feel is random enough. One could also use a MD5HASH_streamname_MD5HASH as token making it longer.
Editing the bash file
The only thing to add is a line at the bottom of the bash file. The line needs to follow this syntax:
checkStream "key" "$IP" "streamname"
Where:
keyis your Stream tokenstreamnameis your set up stream name within MistServer$IPis either$IPto skip IP verification or the IP you want to white list as the only one able to push towards this stream. Usually tokens are enough, but this is another extra security step you can take.
Using the example above and assuming the stream live within MistServer would be:
checkStream "8f4190132f1b6f1dfa3cf52b6c8ef102" "$IP" "live"
To add streams simply keep adding lines below your last, make sure to use a new & correct key and streamname every time.
4. Editing your pushing application
Instead of pushing towards stream live your pushing application would now require the token as stream key/name.
So you would be using 8f4190132f1b6f1dfa3cf52b6c8ef102 instead.
Making the full RTMP address to use
rtmp://mistserveraddress/live/8f4190132f1b6f1dfa3cf52b6c8ef102
or
rtmp://mistserveraddress/live/
stream key: 8f4190132f1b6f1dfa3cf52b6c8ef102
Depending on whether your application wants a full url or a partial with stream key.
When pushing towards this url you should see your stream come online, with the shorter live stream name. While anyone trying to push towards MistServer using the stream name instead of the token will be blocked.
5. Using this set up with SRT
Using this set up with SRT will work almost the same way as RTMP. The major differences are that you'll be setting up an incoming SRT port or use MistServers default ports.
MistServer Configurations
If you're using the defaults of MistServer you can skip this step and your default port will be 8889.
You will need the SRT protocol active in the protocol panel. Look for TS over SRT. For the port you can choose any valid port you like, we would recommend setting the 'Acceptable connection types' to Allow only incoming connections only as this speeds up the input side of things.
Stream Configurations
No changes here, keep the source input on "push://". This will work for both RTMP and SRT after all!
Trigger Configurations
Nothing changes for the trigger script or the trigger itself. Generate a token for every stream name you'd like to use and when it matches it will be accepted.
Pushing application configurations
In order to push towards MistServer you will have to use a newer syntax for pushing SRT. We're going to include the value streamid. This value tells MistServer what stream should be matched with your push attempt, and is exactly what we need for the token matching.
SRT URL
Your SRT urls would work like this:
srt://mistserveraddress:port?streamid=TOKEN
You can follow up the url with any other parameters you want to use in SRT. Using the same token as the RTMP example you'd get:
srt://mistserveraddress:port?streamid=8f4190132f1b6f1dfa3cf52b6c8ef102
MistServer will grab the streamid, match it to the streamnames set in the trigger and forward it to the matching stream name.
6. Wildcard setup
A wildcard setup is where you set up a single live stream and use that configuration for all other live streams that will be going to your platform. It's best use is for platforms that have to deal with a significant amount of live streams from users that might be added on the fly. It's a set up that allows you to make one major stream name and add secondary streams using the same setup. It works by placing a plus symbol (+) behind the stream name, followed by any unique text identifier. For example, if you configured a stream called "test" you could broadcast to the stream "test", but also to "test+1" and "test+2" and "test+foobar". All of them will use the configuration of "test", but use separate buffers and have separate on/off states and can be requested as if they are fully separate streams.
Trigger changes
The only change here is that you need to make the new streams by using mainstream+uniquestream where the uniquestream is the new stream name for every new push.
For example:
checkStream "8f4190132f1b6f1dfa3cf52b6c8ef102" "$IP" "live+uniquestream1"
The token 8f4190132f1b6f1dfa3cf52b6c8ef102 would then create the stream live+uniquestream1 which saves you the setup of making the stream uniquestream1, just adding new lines to this and creating a uniquestream identifyer after the plus every time will allow you to instantly use it.
Conclusion
That is pretty much it for a simple bash method to stream tokens and live streaming. It all comes down to setting up a trigger and adding every new stream to the bash script and giving them an unique token. Now, just to mention it again: we wouldn't recommend something like this for a bigger setup, but it would get you started for a small server.