News
[Blog] Generating a live test stream from a server using command line
Hello everyone! Today I wanted to talk about testing live streams. As you will probably have guessed: in order to truly test a live stream you'll need to be able to give it a live input. In some cases that might be a bit of a challenge, especially if you only have shell access and no live input available. It's for those situations that we've got a script that uses ffmpeg to generate a live feed which we call videogen. The script itself is made for Linux servers, but you could take the ffmpeg command line and use it for any server able to run ffmpeg.
What is videogen
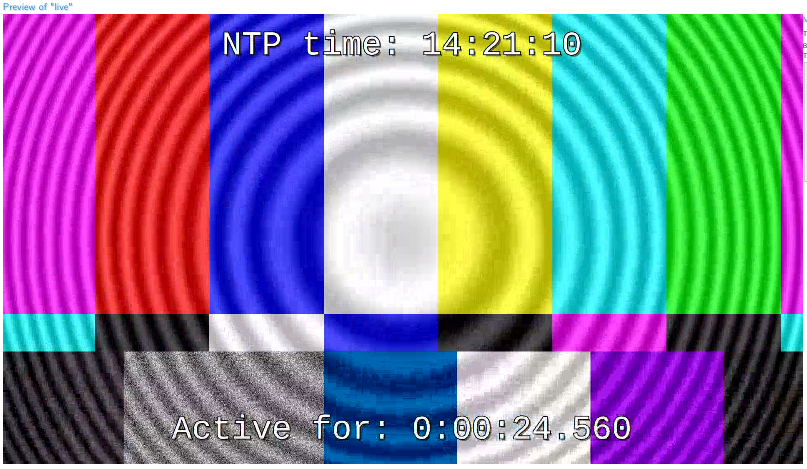
Videogen is a simple generated live stream for testing live input/playback without the need for an actual live source somewhere. It is built on some of the examples available at the ffmpeg wiki site. It looks like this:

Requirements
- Knowledge of how to start and use a terminal in Linux
- Simple knowledge of BASH scripts
- ffmpeg installed or usable for the terminal
- gstreamer installed if you prefer gstreamer
ffmpeg
As you might've suspected, in order to use videogen you'll need ffmpeg. Make sure to have it installed or have the binaries available in order to run videogen. By now ffmpeg is so popular almost every Linux distro will have an official package for it.
Gstreamer
As an alternative to ffmpeg you can also use our Gstreamer script to generate a live test feed. In practise it's nearly the same as videogen, though because we made this one slightly harder to encode it's easier to get higher bitrates with.
Steps in this guide
- Installing videogen
- Using videogen
- Additional parameters for videogen
- Using a multibitrate version for videogen
- Using a videogen directly in MistServer
- Gstreamer alternative
- Using gvideogen
1. Installing videogen
Place the videogen file in your /usr/local/bin directory, or make your own videogen by pasting this code in a file and making it executable:
 #!/bin/bash

 ffmpeg -re -f lavfi -i "aevalsrc=if(eq(floor(t)\,ld(2))\,st(0\,random(4)*3000+1000))\;st(2\,floor(t)+1)\;st(1\,mod(t\,1))\;(0.6*sin(1*ld(0)*ld(1))+0.4*sin(2*ld(0)*ld(1)))*exp(-4*ld(1)) [out1]; testsrc=s=800x600,drawtext=borderw=5:fontcolor=white:fontsize=30:text='%{localtime}/%{pts\:hms}':x=\(w-text_w\)/2:y=\(h-text_h-line_h\)/2 [out0]" \
 -acodec aac -vcodec h264 -strict -2 -pix_fmt yuv420p -profile:v baseline -level 3.0 \
 $@
2. Using Videogen
Videogen is rather easy to use, but it does require some manual input as you need to specify the output, but you can specify any of the codecs inside as well incase you want/need to use something else than our default settings.
The only required manual input is the type of output you want and the output URL (or file). For MistServer your output options are:
RTMP
videogen -f flv rtmp://ADDRESS/APPLICATION/STREAM_NAME
RTSP
videogen -f rtsp rtsp://ADDRESS:PORT/STREAM_NAME
TS Unicast
videogen -f mpegts udp://ADDRESS:PORT
TS Multicast
videogen -f mpegts udp://MULTICASTADDRESS:PORT
SRT
videogen -f mpegts srt://ADDRESS:PORT?streamid=STREAM_NAME
As it's all run locally it doesn't really matter which protocol you'll be using except for one point. RTMP cannot handle multi bitrate using this method, so if you want to create a multi bitrate videogen you'll usually want to use TS.
3. Additional parameters
You'll have access to any of the additional parameters that ffmpeg provides for both video and audio encoding simply by just adding them after the videogen command. Ffmpeg handles the last given parameters if they overwrite previously given parameters. For all the ffmpeg parameters we recommend checking the ffmpeg documentation for codecs, video and audio.
Some of the parameters we tend to use more often are:
-g NUMBER
This determines when keyframes show up. This sets the amount of frames to pass before inserting a keyframe. When set to 25 you'll get one keyframe per second, as videogen runs at 25fps.
-s RESOLUTIONxRESOLUION
This changes the resolution. The default of videogen is 800x600, so setting this to 1920x1080 will make it a "HD" stream, though the quality is barely noticeable with this script. We tend to use screen resolutions to verify a track is working correctly.
-c:v hevc or -c:v h264
This changes the video codec. The default is h264 baseline profile of 3.0, which should be compatible with any modern device. Changing the codec to H265 (HEVC) or "default" h264 changes things and might be exactly what you want to find out. Do note that HEVC cannot work over RTMP, use RTSP or TS instead!
-c:a mp3 -ar 44100
This changes the audio codec. The default is aac, so knowing how to set mp3 instead can be handy. Just be sure to add an audio rate as MP3 tends to bug out when it's not set. We tend to use 44100 as most devices will work with this audio rate.
4. Multibitrate videogen
Obviously you would want to try out a multi bitrate videogen as well, which you can do but will want to use TS for instead of RTMP as RTMP cannot handle multi bitrate through a single stream as push input.
You can find our multi bitrate videogen here.
You can also make an executable file with the following command in it:
 #!/bin/bash

 #multibitrate videogen stuff if you want to edit qualities or codecs edit the parameters per track profile. If you want to add qualities just be sure to map it first (as audio or video depending on what kind of track you want to add). Videotracks will generally need the -pix_fmt yuv420p in order to work with this script.

 exec ffmpeg -hide_banner -re -f lavfi -i "aevalsrc=if(eq(floor(t)\,ld(2))\,st(0\,random(4)*3000+1000))\;st(2\,floor(t)+1)\;st(1\,mod(t\,1))\;(0.6*sin(1*ld(0)*ld(1))+0.4*sin(2*ld(0)*ld(1)))*exp(-4*ld(1)) [out1]; testsrc=s=800x600,drawtext=borderw=5:fontcolor=white:fontsize=30:text='%{localtime}/%{pts\:hms}':x=\(w-text_w\)/2:y=\(h-text_h-line_h\)/2 [out0]" \
 -map a:0 -c:a:0 aac -strict -2 \
 -map a:0 -c:a:1 mp3 -ar:a:1 44100 -ac:a:1 1 \
 -map v:0 -c:v:0 h264 -pix_fmt yuv420p -profile:v:0 baseline -level 3.0 -s:v:0 800x600 -g:v:0 25 \
 -map v:0 -c:v:1 h264 -pix_fmt yuv420p -profile:v:1 baseline -level 3.0 -s:v:1 1920x1080 -g:v:1 25  \
 -map v:0 -c:v:2 hevc -pix_fmt yuv420p -s:v:2 1920x1080 -g:v:2 25 \
 $@
This will create a multi bitrate video stream with aac and mp3 audio and a 800x600, 1920x1080 h264 video stream and a single 1920x1080 h265 (HEVC) stream. That should cover "most" multi bitrate needs.
You will always want to combine this with the ts output for ffmpeg, so using it will come down to:
multivideogen -f mpegts udp://ADDRESS:PORT
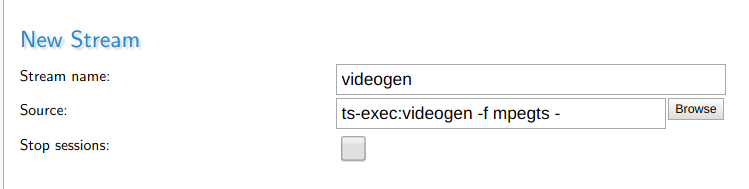
5. Using videogen or multivideogen with MistServer directly
Of course you can also use videogen or multivideogen without a console, you will still have to put the scripts on your server (preferably the /usr/local/bin folder) however.
To use them together with MistServer just use ts-exec and the mpegts output of ffmpeg like this:
MistServer source:
 ts-exec:videogen -f mpegts -
 ts-exec:multivideogen -f mpegts -
You can put the streams on always on to have a continuous live stream or leave them on default settings and only start the live stream when you need it. Keep in mind that as long as they're active they will use CPU.
6. Gstreamer method
6.1 RTMP
Gstreamer can provide a live stream as well and it helps having another method than just ffmpeg. There is no big benefit to Gstreamer vs ffmpeg for this use-case, so we would recommend to go with what you're familiar with.
To use Gstreamer you need to install the gvideogen file in your /usr/bin/ or make your own videogen by pasting this code in a file and making it executable:
 #!/bin/bash
 RTMP_ARG="${1}"
 BITRATE="${2:-5000}"

 GFONT='font-desc="Consolas, 20"'
 GTEXT="timeoverlay halignment=center valignment=bottom text=\"Active for:\" $GFONT ! clockoverlay halignment=center valignment=top text=\"NTP time:\" $GFONT"
 GVIDCONF="video/x-raw,height=1080,width=1920,framerate=25/1,format=I420"
 TESTIMG="videotestsrc horizontal-speed=5 ! $GVIDCONF ! mix. \
 videotestsrc pattern=zone-plate kx2=7 ky2=4 kt=15 ! $GVIDCONF ! mix. \
 videomixer name=mix sink_0::alpha=1 sink_1::alpha=0.3 ! $GTEXT ! videoconvert"
 TESTAUD="audiotestsrc wave=ticks ! faac"

 gst-launch-1.0 -q $TESTIMG ! x264enc pass=qual speed-preset=ultrafast bframes=0 quantizer=25 key-int-max=125 bitrate="${BITRATE}" ! mux. $TESTAUD ! mux. flvmux name=mux ! rtmpsink location="${RTMP_ARG}"
The usage is simple, simply call upon the script then add the push target and optionally add the target bitrate. That's all!
Example:
./gstreamscript rtmp://mistserveraddress/live/stream_name 2000
6.2 SRT
The method to send SRT differs slightly, but enough that it's best just make an additional script. The idea is the same as RTMP, simply fill in the SRT address after calling upon the script.
#!/bin/bash
URL="${1}"
BITRATE="${2:-5000}"

GFONT='font-desc="Consolas, 20"'
GTEXT="timeoverlay halignment=center valignment=bottom text=\"Active for:\" $GFONT ! clockoverlay halignment=center valignment=top text=\"NTP time:\" $GFONT"
GVIDCONF="video/x-raw,height=1080,width=1920,framerate=25/1,format=I420"
TESTIMG="videotestsrc horizontal-speed=5 ! $GVIDCONF ! mix. \
videotestsrc pattern=zone-plate kx2=7 ky2=4 kt=15 !
$GVIDCONF ! mix. \
videomixer name=mix sink_0::alpha=1 sink_1::alpha=0.3 ! $GTEXT ! videoconvert"
TESTAUD="audiotestsrc wave=ticks ! faac"

gst-launch-1.0 -q $TESTIMG ! x264enc pass=qual speed-preset=ultrafast bframes=0 quantizer=25 key-int-max=25 bitrate="${BITRATE}" ! mux. $TESTAUD ! mux. mpegtsmux name=mux ! srtsink uri="${URL}"
Example:
./gstreamsrtscript srt://mistserveraddress:8889?streamid=stream_name 2000
7. Using gvideogen
The usage is like videogen, but if you want to do something else than RTMP you will need to make quite some edits to the pipeline. We will keep things simple for this one and stay on RTMP. Let us know if you're interested in a deeper dive for Gstreamer and we will update the article or create a new one.
gvideogen defaults to 5000kbps if the bitrate is not set.
RTMP
Use the gvideogen as is with the following command:
gvideogen rtmp://server/live/streamname (bitrate_in_kbps)
8. Testfiles
We've created a megamix which you can use to verify both track switching and retention of track information with. You can also loop this into MistServer instead of running a script. Keep in mind that any time you use a VOD stream browsers tend to keep that in cache, so when it loops you might be looking at the cache instead of what comes out of your server.
On request we have added several high resolution streams for our users to help check out their server limits. Consider using most of these files only on local networks as they would fail over most internet connections.
Megamix
downloadlink (95 Mb)
This is a 5min long video of several qualities with several languages (Dutch, German, English). Qualities come in:
 1920p H264(constrained baseline) Dutch, German, English
 720p H264(constrained baseline) Dutch, German, English
 480p H264(constrained baseline) Dutch, German, English
 Mono AAC 44100hz Dutch, German, English
The goal of this file is to test multiple tracks and meta information.
148mbps
downloadlink (2.0 Gb)
This is a 1min 50sec video of 148mbps. This is meant to test how your system deals with high bitrate streams. Keep in mind that the bitrate of this video is actually higher than most internet connections would be able to handle, so expect playback to fail. Qualities come in:
 3000x3000 H264(constrained baseline)
 Mono AAC 44100hz
62mbps
downloadlink (1.1 Gb)
This is a 2min 20sec video of 62mbps. This stream is also meant to test how your system deals with high bitrate streams, only in a slightly more normal resolution format. Expect playback to fail for most connections.
Qualities come in:
 2560x1440 H264(constrained baseline)
 Mono AAC 44100hz
17mbps
downloadlink (124 Mb)
This is a 1min video of 17mbps. This stream is meant to test high bitrate limits of your system when it comes to a "normal" HDMI format.
Qualities come in:
 1920p H264(constrained baseline)
 Mono AAC 44100hz