News
[News] Happy holidays from MistServer
Hello everyone!
We would like to give you all season's greetings, hope that the last bit of December will be kind to you all and best wishes for 2019.
Until Januari 3rd 2019 we might be a bit slow on our communication as many of our team will be spending the time with their families, but we'll do our absolute best to make up the difference once the new year starts!

The MistServer team
[Release] Bugfix release 2.14.2 now available!
Hello everyone! Bugfix release 2.14.2 of MistServer is now available! The full change log is available here and downloads are here. Our Pro-edition customers with active licenses will receive a new build notification in their e-mail automatically.
Here are some highlights:
- Lock-free server configuration implementation, fixing several recurring CPU usage and locking issues that happened in the earlier 2.14 releases.
- HTTP handler no longer uses unreliable peek() system call, also solving a potential trickle attack vulnerability.
- Logging is more human-friendly
- Statistics and viewer counter fixes
- ARMv7 builds compile correctly again (sorry for breaking these!)
- Many other small fixes/improvements/etc. See changelog for full list!
[Blog] Transcript: Making sense out of the fragmented OTT delivery landscape.
Hello Everyone,
Last month was IBC2018 and they've finally released the presentations. We thought it would be nice to add our CTO Jaron's presentation as he explains how to make sense of the fragmented OTT landscape.
You can find the full presentation, slides and a transcript below.
Transcript
SLIDE #1
Alright, hello everyone. Well as Ian just introduced I'm going to talk about the fragmented OTT delivery landscape.
SLIDE #2
Because, well, it is really fragmented. There are several types of streaming.
To begin we've got real time streaming, the streaming that everyone knows and loves, so to speak.
And we have pseudo streaming, which is like if you have an HTTP server and you pretend a file is there, but it's not really a file it's actually a live stream and you're just sending it pretending there’s a file.
But that wasn't enough, of course! Segmented streaming came afterwards - which is the current popular method, where you segment a stream in several parts and you have an index and then that index just updates with new parts as they become available.
Now it would be nice if it was this simple and it was just three methods, but unfortunately it is a little bit more complicated.
SLIDE #3
All of these methods have several protocols they can use to deliver. There's different protocols for real-time, pseudo and segmented and of course none of these are compatible with each other.
There are also players, besides all this. There is a ton of them, just in this hall alone there's at least seven or eight and they all say they do the same thing; and they do, and they all work fine. But how do you know what to pick? It's hard.
SLIDE #4
We should really stop making new standards.
SLIDE #5
So, real time streaming was the first one i mentioned. There's RTMP, which is the well known protocol that many systems still use as their ingest. But it's not used very often in delivery, as Flash is no longer supported in browsers. It's a very outdated protocol, it doesn't support HEVC, AV1, Opus; all the newer codecs aren't in there. But the protocol itself is highly supported by encoders and streaming services. It's something that’s hard to get rid of.
Then there's RTSP with RTP at the core, which is an actual standard unlike RTMP which is something Adobe just invented. RTSP supports a lot of things and it's very versatile. You can transport almost anything through it, but it's getting old. There's an RTSP version 2, which no one supports, but it exists. Version one is well supported but only in certain markets, like IP cameras. Most other things not as much and in browsers you can forget about it.
And then there's something newer for real-time streaming, which is WebRTC. WebRTC is the new cool kid on the block and it uses SRTP internally which is RTP with security added. Internally it's basically the same thing, but this works on browsers, which is nice as that means you can actually use it for most consumers unlike RTSP.
That gives you a bit of an overview of real time streaming. Besides these protocols you can also pick between TCP and UDP. TCP is what most internet connections use. It's a reliable method to send things, but because of it being reliable it's a bit slower and the latency is a bit higher. UDP is unreliable but has very low latency. Depending on what you're trying to do you might want to use one or the other.
All of these protocols work with TCP and/or UDP. RTMP is always TCP, RTSP can be either and WebRTC is always UDP. The spec of WebRTC says it can also use TCP, but I don't know a single browser that supports it so it's kind-of a moot point.
SLIDE #6
Then there's pseudo streaming which as i mentioned before uses fake files that are playing while they're downloading. They're infinite in length and duration, so you can't actually download them. Well, you can, but you end up with a huge file and you don't know exactly where the beginning and the end is, so it's not very nice.
While pseudo streaming is a pretty good idea in theory, there are some downsides. Besides disagreement on what format to pseudo-stream in, because there's lots of formats - like FLV, MP4, OGG, etcetera - and they all sort of work but none perfectly. The biggest downside is that you cannot cache these as they're infinite in length. So a proxy server will not store them and you cannot send them to a CDN, plus how do you decide where the beginning and end are? So pseudo streaming is nice method, but it doesn't work on a scalable system very well.
SLIDE #7
Now segmented streaming kind of solves that problem, because when you cut the stream into little files and have an index to say where those files are you can upload those little files to your CDN or cache them in a caching server and these files will not change. You just add more and remove others and the system works.
There are some disagreements here too between the different formats. Like what do we use to index? HLS uses text, but DASH uses XML. They contain the same information, but differ in the way of writing it. The container format for storing the segments themselves is also not clear: HLS uses TS and DASH uses MP4. Though they are kind of standardizing now to fMP4, but let's not go too deep here. The best practices and allowed combinations of what codecs work and which ones do not, do you align the keyframes or not - all of that differs between protocols as well. It’s hard to reach an agreement there too.
The biggest problem in segmented streaming is the high latency. Because many players want to buffer a couple of segments before playing, which means if your segments are several seconds long you will have a minimal latency of several times a couple of seconds. Which is not real-time in my understanding of the word “real-time”.
The compatibility with players and devices is also hard to follow. HLS works fine in iOS, but DASH does not unless it's fMP4 and you put a different index in front of it and it'll then only play on newer iOS models. It's hard to keep track of what will play where, that's also a kind of fragmentation you will need to solve for all of this.
SLIDE #8
So I kind of lied during the introduction when I had this slide up, there's even more fragmentation other than just these 3 types and their subtypes.
There's also encrypted streaming. When it comes to encrypted streaming there's Fairplay, Playready, Widevine and CENC which tries to combine them a little bit. But even in that they don't agree on what encryption scheme to use. So encryption is even fragmented into two different levels of fragmentation.
Then there are reliable transports now, which are getting some popularity. These are intended for between servers, because you generally don't do this to the end consumer. There are several options here too: some of these are companies/protocols that have been around for a while, some are relatively new, some are still in development, some are being standardized and some are not. That's also a type of fragmentation you may have to deal with if you do OTT streaming.
SLIDE #9
When it comes to encrypted streaming there is the common encryption standard, CENC. Common encryption, that is what it stands for, but it's not really common because it only standardizes the format and how to transport it. It standardizes on fMP4, it standardizes on where the encryption keys are, etc. But not what type of encryption to use. All encryption types use a block cipher, but some are counter based and others are not. So depending on what type of DRM you're using you might have to use one or the other. It's not really standardized, yet it is, so it's confusing on that level as well.
SLIDE #10
Then the reliable transports, they are intended for server to server. All of them use these techniques in some combination. Some add a little bit of extra fluff or remove some of it. But they all use these techniques at the core.
Forward error correction sends extra data with the stream that allows you to calculate the contents of data that is not arriving. This means not wasting any time asking for retransmits, since you can just recalculate what was missing so you don't have to ask the other server and have another round-trip in between.
Retransmits are sort of self-explanatory, where the receiving end says "hey i didn't receive package X can you retransmit it, send me another copy". This wastes time but eventually you do always get all the data so you can resolve the stream properly.
Bonding is something on a different level altogether where you connect multiple network interfaces like wireless network and GSM and you send data over both, hoping that with the combination of everything it will all end up arriving.
If you combine all three techniques of course you will get really good reception, at the cost of lots of overhead.
There's no standardization at all yet on reliable transports. It's very unclear what the advantages and disadvantages are of all these available ones. The ones listed in the previous slide all claim to be the best, to be perfect and to use a combination of the techniques. There's no real guide as to which you should be using.
So... lots of fragmentation in OTT.
SLIDE #11
So what do you do to fix all that fragmentation? Now this is where my marketing kicks in.
Right there is our booth, we are DDVTech, we make MistServer and it's a technology you can use to build your own systems on top of. We give you the engine you use underneath your own system and we help you solve all of these problems so you can focus on what makes your business unique and not have to worry about standardization, what to implement and what the next hot thing tomorrow is going to be.
We also allow you to auto-select protocols based on the stream contents and device you're trying to play on or what the network conditions are. Basically everything you need to be successful when you're building an OTT platform.
SLIDE #12
That’s the end of my presentation, if you have any questions you can drop by our booth or shoot us an email on our info address and we’ll help you out and get talking.
[News] Now at IBC2018
Hello everyone!
Like last year we are exhibiting at IBC2018 this year. If you happen to attend IBC please don't forget to drop by and say hi - we'd be more than happy to meet you!
We'll be available at booth C10 in Hall 14. Though if you want to talk to a specific person it is a good idea to contact us to schedule a meeting.
I'm also sorry to say that since most of our team will be attending the IBC, some of the more difficult e-mail support questions we receive might be answered a bit slower.
[Blog] How to build a Twitch-alike service with MistServer
Hey all! First of all, our apologies for the lack of blog posts recently - we've been very busy with getting the new 2.14 release out to everyone. Expect more posts here so that we can catch back up to our regular posting pace!
Anyway - hi 👋! This is Jaron, not with a technical background article (next time, I promise!) but with a how-to on how you can build your own social streaming service (like Twitch or YouTube live) using MistServer. We have more and more customers running these kind of implementations lately, and I figured it would be a good idea to outline the steps needed for a functional integration for future users.
A social streaming service, usually has several common components:
- A login system with users
- The ability to push (usually RTMP) to an "origin" server (e.g. sending your stream to the service)
- A link between those incoming pushes and the login system (so the service knows which stream belongs to which user)
- A check to see if a viewer is allowed to watch a specific stream (e.g. paid streams, password-protected streams, age restricted stream, etc)
- The ability to record streams and play them back later as Video on Demand
Now, MistServer can't help you with the login system - but you probably don't want it to, either. You'll likely already have a login system in place and want to keep that and its existing database. It's not MistServer's job to keep track of your users anyway. The Unix philosophy is to do one thing and do it well, and Mist does streaming; nothing else.
How to support infinite streams without configuring them all
When you're running a social streaming service, you need to support effectively infinite streams. MistServer allows you to configure streams over the API, but that is not ideal: Mist start to slow down after a few hundred streams are configured, and the configuration becomes a mess of old streams.
Luckily, MistServer has a feature that allows you to configure once, and use that stream config infinite times at once: wildcard streams. There's no need to do anything special to activate wildcard mode: all live streams automatically have it enabled. It works by placing a plus symbol (+) behind the stream name, followed by any unique text identifier. For example, if you configured a stream called "test" you could broadcast to the stream "test", but also to "test+1" and "test+2" and "test+foobar". All of them will use the configuration of "test", but use separate buffers and have separate on/off states and can be requested as if they are fully separate streams.
So, a sensible way to set things up is to use for example the name "streams" as stream name, and then put a plus symbol and the username behind it to create the infinite separate streams. For example, user "John" could have the stream "streams+John".
Receiving RTMP streams in the commonly accepted format for social streaming
Usually, social streaming uses RTMP URLs following a format similar to rtmp://example.com/live/streamkey.
However, MistServer uses the slightly different format rtmp:example.com/passphrase/streamname. It's inconvenient for users to have to comply with Mist's native RTMP URL format, so it makes sense to tweak the config so they are able to use a more common format instead.
The ideal method for this is using the RTMP_PUSH_REWRITE trigger. This trigger will call an executable/script or retrieve an URL, with as payload the RTMP URL and the IP address of the user attempting to push, before MistServer does any parsing on it whatsoever. Whatever your script or URL returns back to MistServer is then parsed by MistServer as-if it was the actual RTMP URL, and processing continues as normal afterwards. Blanking the returned URL results in the push attempt being rejected and disconnected. Check MistServer's manual (under "Integration", subchapter "Triggers") for the documentation of this trigger.
An example in PHP could look like this:
<?PHP
//Retrieve the data from Mist
$payload = file_get_contents('php://input');
//Split payload into lines
$lines = explode("\n", $payload);
//Now $lines[0] contains the URL, $lines[1] contains the IP address.

//This function is something you would implement to make this trigger script "work"
$user = parseUser($lines[0], $lines[1]);
if ($user != ""){
  echo "rtmp://example.com//streams+".$user;
}else{
  echo ""; //Empty response, to disconnect the user
}
//Take care not to print anything else after the response, not even any newlines! MistServer expects a single line as response and nothing more.
The idea is that the parseUser function looks up the stream key from the RTMP URL in a database of users, and returns the username attached to that stream key. The script then returns the new RTMP URL as rtmp://example.com//streams+USERNAME, effectively allowing the push as well as directing it to a unique stream for the authorized user. Problem solved!
How to know when a user starts/stops broadcasting
This one is pretty easy with triggers as well: the STREAM_BUFFER trigger is ideal for this purpose. The STREAM_BUFFER trigger will go off every time the buffer changes state, meaning that it goes off whenever it fills, empties, goes into "unstable" mode or "stable" mode. Effectively, MistServer will let you know when the stream goes online and offline, but also when the stream settings aren't ideal for the user's connection and when they go back to being good again. All in real-time! Simply set up the trigger and store the user's stream status into your own local database to keep track. Check MistServer's manual (under "Integration", subchapter "Triggers") for the documentation of this trigger.
Access control
Now, you may not want every stream accessible for every user. Limiting this access in any way, is a concept usually referred to as "access control". My colleague Carina already wrote an excellent blog post on this subject last year, and I suggest you give it a read for more on how to set up access control with MistServer.
Recording streams and playing them back later
The last piece of the puzzle: recording and Video on Demand. To record streams, you can use our push functionality. This sounds a little out of place, until you wrap your head around the idea that MistServer considers recording to be a "push to file". A neat little trick is that configuring an automatic push for the stream "stream+" will automatically activate this push for every single wildcard instance of the stream "stream"! Combined with our support for text replacements (detailed in the manual in the chapter 'Target URLs and settings'), you can have this automatically record to file. For example, a nice target URL could be: /mnt/recordings/$wildcard/$datetime.mkv. That URL will sort recordings into folders per username and name the files after the date and time the stream started. This example records in Matroska (MKV) format (more on that format in my next blog post, by the way!), but you could also record in FLV or TS format simply by changing the extension.
If you want to know when a recording has finished, how long it is, and what filename it has... you guessed it, we have a trigger for that purpose too. Specifically, RECORDING_END. This trigger fires off whenever a recording finishes writing to file, and the payload contains all relevant details on the new recording. As with the previous triggers, the manual, under "Integration", subchapter "Triggers", has all relevant details.
There is nothing special you need to do to make the recordings playable through MistServer as well - they can simply be set up like any other VoD stream. But ideally, you'll want to use something similar to what was described in another of our blogposts last year, on how to efficiently access a large media library. Give it a read here, if you're interested.
In conclusion
Hopefully that was all you needed to get started with using MistServer for social streaming! As always, contact us if you have any questions or feedback!
[Release] Stable release 2.14 now available!
Hello everyone! Stable release 2.14 of MistServer is now available! The full change log is available here and downloads are here. Our Pro-edition customers with active licenses will receive a new build notification in their e-mail automatically.
Here are some highlights:
- Full MKV/WebM support for both input and output
- (Pro) MKV recording support
- Websocket versions of many data feeds, to improve on polling-based techniques
- (Websocket-based) JSON metadata track input and output
- RTSP, RTMP and JSON timestamps are automatically synced together when send to the same stream
- (Pro) Added USER_END trigger which triggers when an access log entry is written
- Significant improvements to RTSP and HTTP(S) handling (mostly relevant for Pro edition)
- More precise track selection mechanic
- Greatly improved overall system stability
- Many other small fixes/improvements/etc. See changelog for full list!
[Blog] Generating a live test stream from a server using command line
Hello everyone! Today I wanted to talk about testing live streams. As you will probably have guessed: in order to truly test a live stream you'll need to be able to give it a live input. In some cases that might be a bit of a challenge, especially if you only have shell access and no live input available. It's for those situations that we've got a script that uses ffmpeg to generate a live feed which we call videogen. The script itself is made for Linux servers, but you could take the ffmpeg command line and use it for any server able to run ffmpeg.
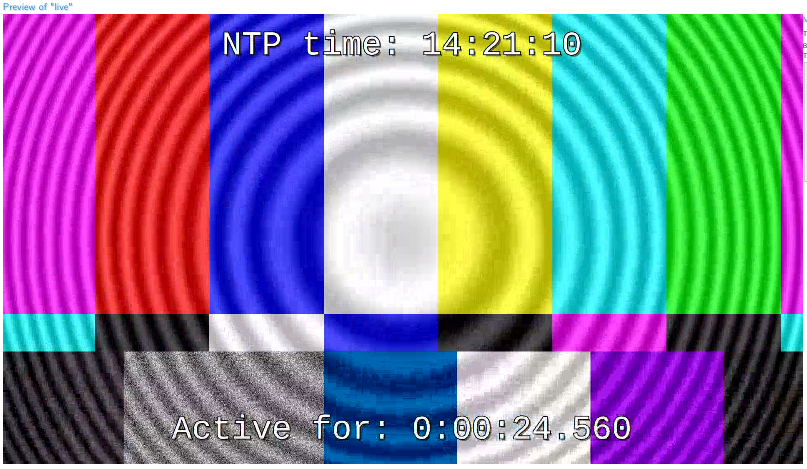
What is videogen
Videogen is a simple generated live stream for testing live input/playback without the need for an actual live source somewhere. It is built on some of the examples available at the ffmpeg wiki site. It looks like this:

Requirements
- Knowledge of how to start and use a terminal in Linux
- Simple knowledge of BASH scripts
- ffmpeg installed or usable for the terminal
- gstreamer installed if you prefer gstreamer
ffmpeg
As you might've suspected, in order to use videogen you'll need ffmpeg. Make sure to have it installed or have the binaries available in order to run videogen. By now ffmpeg is so popular almost every Linux distro will have an official package for it.
Gstreamer
As an alternative to ffmpeg you can also use our Gstreamer script to generate a live test feed. In practise it's nearly the same as videogen, though because we made this one slightly harder to encode it's easier to get higher bitrates with.
Steps in this guide
- Installing videogen
- Using videogen
- Additional parameters for videogen
- Using a multibitrate version for videogen
- Using a videogen directly in MistServer
- Gstreamer alternative
- Using gvideogen
1. Installing videogen
Place the videogen file in your /usr/local/bin directory, or make your own videogen by pasting this code in a file and making it executable:
 #!/bin/bash

 ffmpeg -re -f lavfi -i "aevalsrc=if(eq(floor(t)\,ld(2))\,st(0\,random(4)*3000+1000))\;st(2\,floor(t)+1)\;st(1\,mod(t\,1))\;(0.6*sin(1*ld(0)*ld(1))+0.4*sin(2*ld(0)*ld(1)))*exp(-4*ld(1)) [out1]; testsrc=s=800x600,drawtext=borderw=5:fontcolor=white:fontsize=30:text='%{localtime}/%{pts\:hms}':x=\(w-text_w\)/2:y=\(h-text_h-line_h\)/2 [out0]" \
 -acodec aac -vcodec h264 -strict -2 -pix_fmt yuv420p -profile:v baseline -level 3.0 \
 $@
2. Using Videogen
Videogen is rather easy to use, but it does require some manual input as you need to specify the output, but you can specify any of the codecs inside as well incase you want/need to use something else than our default settings.
The only required manual input is the type of output you want and the output URL (or file). For MistServer your output options are:
RTMP
videogen -f flv rtmp://ADDRESS/APPLICATION/STREAM_NAME
RTSP
videogen -f rtsp rtsp://ADDRESS:PORT/STREAM_NAME
TS Unicast
videogen -f mpegts udp://ADDRESS:PORT
TS Multicast
videogen -f mpegts udp://MULTICASTADDRESS:PORT
SRT
videogen -f mpegts srt://ADDRESS:PORT?streamid=STREAM_NAME
As it's all run locally it doesn't really matter which protocol you'll be using except for one point. RTMP cannot handle multi bitrate using this method, so if you want to create a multi bitrate videogen you'll usually want to use TS.
3. Additional parameters
You'll have access to any of the additional parameters that ffmpeg provides for both video and audio encoding simply by just adding them after the videogen command. Ffmpeg handles the last given parameters if they overwrite previously given parameters. For all the ffmpeg parameters we recommend checking the ffmpeg documentation for codecs, video and audio.
Some of the parameters we tend to use more often are:
-g NUMBER
This determines when keyframes show up. This sets the amount of frames to pass before inserting a keyframe. When set to 25 you'll get one keyframe per second, as videogen runs at 25fps.
-s RESOLUTIONxRESOLUION
This changes the resolution. The default of videogen is 800x600, so setting this to 1920x1080 will make it a "HD" stream, though the quality is barely noticeable with this script. We tend to use screen resolutions to verify a track is working correctly.
-c:v hevc or -c:v h264
This changes the video codec. The default is h264 baseline profile of 3.0, which should be compatible with any modern device. Changing the codec to H265 (HEVC) or "default" h264 changes things and might be exactly what you want to find out. Do note that HEVC cannot work over RTMP, use RTSP or TS instead!
-c:a mp3 -ar 44100
This changes the audio codec. The default is aac, so knowing how to set mp3 instead can be handy. Just be sure to add an audio rate as MP3 tends to bug out when it's not set. We tend to use 44100 as most devices will work with this audio rate.
4. Multibitrate videogen
Obviously you would want to try out a multi bitrate videogen as well, which you can do but will want to use TS for instead of RTMP as RTMP cannot handle multi bitrate through a single stream as push input.
You can find our multi bitrate videogen here.
You can also make an executable file with the following command in it:
 #!/bin/bash

 #multibitrate videogen stuff if you want to edit qualities or codecs edit the parameters per track profile. If you want to add qualities just be sure to map it first (as audio or video depending on what kind of track you want to add). Videotracks will generally need the -pix_fmt yuv420p in order to work with this script.

 exec ffmpeg -hide_banner -re -f lavfi -i "aevalsrc=if(eq(floor(t)\,ld(2))\,st(0\,random(4)*3000+1000))\;st(2\,floor(t)+1)\;st(1\,mod(t\,1))\;(0.6*sin(1*ld(0)*ld(1))+0.4*sin(2*ld(0)*ld(1)))*exp(-4*ld(1)) [out1]; testsrc=s=800x600,drawtext=borderw=5:fontcolor=white:fontsize=30:text='%{localtime}/%{pts\:hms}':x=\(w-text_w\)/2:y=\(h-text_h-line_h\)/2 [out0]" \
 -map a:0 -c:a:0 aac -strict -2 \
 -map a:0 -c:a:1 mp3 -ar:a:1 44100 -ac:a:1 1 \
 -map v:0 -c:v:0 h264 -pix_fmt yuv420p -profile:v:0 baseline -level 3.0 -s:v:0 800x600 -g:v:0 25 \
 -map v:0 -c:v:1 h264 -pix_fmt yuv420p -profile:v:1 baseline -level 3.0 -s:v:1 1920x1080 -g:v:1 25  \
 -map v:0 -c:v:2 hevc -pix_fmt yuv420p -s:v:2 1920x1080 -g:v:2 25 \
 $@
This will create a multi bitrate video stream with aac and mp3 audio and a 800x600, 1920x1080 h264 video stream and a single 1920x1080 h265 (HEVC) stream. That should cover "most" multi bitrate needs.
You will always want to combine this with the ts output for ffmpeg, so using it will come down to:
multivideogen -f mpegts udp://ADDRESS:PORT
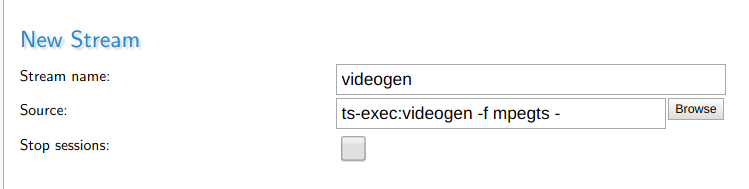
5. Using videogen or multivideogen with MistServer directly
Of course you can also use videogen or multivideogen without a console, you will still have to put the scripts on your server (preferably the /usr/local/bin folder) however.
To use them together with MistServer just use ts-exec and the mpegts output of ffmpeg like this:
MistServer source:
 ts-exec:videogen -f mpegts -
 ts-exec:multivideogen -f mpegts -
You can put the streams on always on to have a continuous live stream or leave them on default settings and only start the live stream when you need it. Keep in mind that as long as they're active they will use CPU.
6. Gstreamer method
6.1 RTMP
Gstreamer can provide a live stream as well and it helps having another method than just ffmpeg. There is no big benefit to Gstreamer vs ffmpeg for this use-case, so we would recommend to go with what you're familiar with.
To use Gstreamer you need to install the gvideogen file in your /usr/bin/ or make your own videogen by pasting this code in a file and making it executable:
 #!/bin/bash
 RTMP_ARG="${1}"
 BITRATE="${2:-5000}"

 GFONT='font-desc="Consolas, 20"'
 GTEXT="timeoverlay halignment=center valignment=bottom text=\"Active for:\" $GFONT ! clockoverlay halignment=center valignment=top text=\"NTP time:\" $GFONT"
 GVIDCONF="video/x-raw,height=1080,width=1920,framerate=25/1,format=I420"
 TESTIMG="videotestsrc horizontal-speed=5 ! $GVIDCONF ! mix. \
 videotestsrc pattern=zone-plate kx2=7 ky2=4 kt=15 ! $GVIDCONF ! mix. \
 videomixer name=mix sink_0::alpha=1 sink_1::alpha=0.3 ! $GTEXT ! videoconvert"
 TESTAUD="audiotestsrc wave=ticks ! faac"

 gst-launch-1.0 -q $TESTIMG ! x264enc pass=qual speed-preset=ultrafast bframes=0 quantizer=25 key-int-max=125 bitrate="${BITRATE}" ! mux. $TESTAUD ! mux. flvmux name=mux ! rtmpsink location="${RTMP_ARG}"
The usage is simple, simply call upon the script then add the push target and optionally add the target bitrate. That's all!
Example:
./gstreamscript rtmp://mistserveraddress/live/stream_name 2000
6.2 SRT
The method to send SRT differs slightly, but enough that it's best just make an additional script. The idea is the same as RTMP, simply fill in the SRT address after calling upon the script.
#!/bin/bash
URL="${1}"
BITRATE="${2:-5000}"

GFONT='font-desc="Consolas, 20"'
GTEXT="timeoverlay halignment=center valignment=bottom text=\"Active for:\" $GFONT ! clockoverlay halignment=center valignment=top text=\"NTP time:\" $GFONT"
GVIDCONF="video/x-raw,height=1080,width=1920,framerate=25/1,format=I420"
TESTIMG="videotestsrc horizontal-speed=5 ! $GVIDCONF ! mix. \
videotestsrc pattern=zone-plate kx2=7 ky2=4 kt=15 !
$GVIDCONF ! mix. \
videomixer name=mix sink_0::alpha=1 sink_1::alpha=0.3 ! $GTEXT ! videoconvert"
TESTAUD="audiotestsrc wave=ticks ! faac"

gst-launch-1.0 -q $TESTIMG ! x264enc pass=qual speed-preset=ultrafast bframes=0 quantizer=25 key-int-max=25 bitrate="${BITRATE}" ! mux. $TESTAUD ! mux. mpegtsmux name=mux ! srtsink uri="${URL}"
Example:
./gstreamsrtscript srt://mistserveraddress:8889?streamid=stream_name 2000
7. Using gvideogen
The usage is like videogen, but if you want to do something else than RTMP you will need to make quite some edits to the pipeline. We will keep things simple for this one and stay on RTMP. Let us know if you're interested in a deeper dive for Gstreamer and we will update the article or create a new one.
gvideogen defaults to 5000kbps if the bitrate is not set.
RTMP
Use the gvideogen as is with the following command:
gvideogen rtmp://server/live/streamname (bitrate_in_kbps)
8. Testfiles
We've created a megamix which you can use to verify both track switching and retention of track information with. You can also loop this into MistServer instead of running a script. Keep in mind that any time you use a VOD stream browsers tend to keep that in cache, so when it loops you might be looking at the cache instead of what comes out of your server.
On request we have added several high resolution streams for our users to help check out their server limits. Consider using most of these files only on local networks as they would fail over most internet connections.
Megamix
downloadlink (95 Mb)
This is a 5min long video of several qualities with several languages (Dutch, German, English). Qualities come in:
 1920p H264(constrained baseline) Dutch, German, English
 720p H264(constrained baseline) Dutch, German, English
 480p H264(constrained baseline) Dutch, German, English
 Mono AAC 44100hz Dutch, German, English
The goal of this file is to test multiple tracks and meta information.
148mbps
downloadlink (2.0 Gb)
This is a 1min 50sec video of 148mbps. This is meant to test how your system deals with high bitrate streams. Keep in mind that the bitrate of this video is actually higher than most internet connections would be able to handle, so expect playback to fail. Qualities come in:
 3000x3000 H264(constrained baseline)
 Mono AAC 44100hz
62mbps
downloadlink (1.1 Gb)
This is a 2min 20sec video of 62mbps. This stream is also meant to test how your system deals with high bitrate streams, only in a slightly more normal resolution format. Expect playback to fail for most connections.
Qualities come in:
 2560x1440 H264(constrained baseline)
 Mono AAC 44100hz
17mbps
downloadlink (124 Mb)
This is a 1min video of 17mbps. This stream is meant to test high bitrate limits of your system when it comes to a "normal" HDMI format.
Qualities come in:
 1920p H264(constrained baseline)
 Mono AAC 44100hz
[Blog] Repushing to social media and streaming services using MistServer
Hey everyone, Balder here. Today I wanted to talk about repushing to social media like Youtube and Facebook or streaming services like Twitch and Picarto using MistServer. Why would you want to put a media server in the middle of this, what would the benefit be and how do you set it up? Let's find out shall we.
When do you want to use MistServer to repush?
There could be multiple reasons why you would want to use MistServer to push your live stream to your social media or streaming service, but the most likely answer will be that you're pushing to multiple platforms at the same time.
You will want to use MistServer once you stream to more than one platform as it saves your local PC the trouble of creating several live streams at the same time and sending them out. Besides needing less resources (bandwidth, CPU and RAM) because you'll only have one stream outgoing, MistServers unique buffering feature allows it to reach all the stream targets from the same buffer. Your viewers will get the exact same stream no matter their preferred platform of watching.
Other reasons to put MistServer in between would be using MistServer to record or using MistServer's input to transcode the stream before sending it to your targets. Those cases are usually best handled on your first encoding machine unless your machine is having trouble keeping up to real-time when doing everything at the same time.
Repushing a stream through MistServer
Repushing through MistServer unsurprisingly goes through the "Push" panel. There's two options: push or automatic push. In order to push a stream using MistServer you will need to have a stream created, so be sure to make your live stream first.
Push starts a push of your chosen stream immediately and once it's done it will stop and remove itself. Activating a push on a stream that is offline will close again almost immediately so don't use this option on streams that aren't active.
Automatic push will do a push of your chosen stream everytime it becomes active, so it will wait until you start pushing and immediately pushes the stream to the given target as well under its default settings. You can also set it up to wait a few seconds and then start pushing, but that's generally not something you would use for live streaming. In general it's the option you want when you want to automatically push towards your other platforms from a single point.
Once you've chosen your method you just need to fill in the stream name used within MistServer and the target to push to.
An example of streaming to Picarto would be:
Stream name: {mylivestream}
Target: rtmp://live.eu-west1.picarto.tv/golive/{my_picarto_stream_key}
As you can see it'll be as easy as knowing the push target and if you want to push to multiple platforms at the same time just add another one. I'll leave a short explanation for Youtube, Facebook, Twitch and Picarto below.
Pay attention to the "?" symbol
MistServer assumes that the last "?" symbol will be used to include additional parameters like track selection or push mode. If your given stream target has a question mark included in the path, make sure you add an additional "?" at the end of the given stream target. The question mark itself will be removed don't worry.
YouTube
Youtube has everything you need in your live dashboard overview. You can get at the right panel by going to your creator studio and selecting live streaming and stream now. At the bottom of that page will be the RTMP url and your stream key. Just use those in MistServer and you should be good.
Your stream target will be something like:
rtmp://a.rtmp.youtube.com/live2/{youtube_stream_name_key}
Facebook
Facebook finally has a permanent stream key so that makes things easier; there's no longer a need to prepare a stream key before going live. You'll need to go to the facebook live page and tick the box for a permanent key. After that just fill in the URL and stream key, but do note that stream keys from Facebook always contain a "?" symbol, so you need to add one at the end in order to work properly with MistServer.
Your stream target will be something like:
rtmp://live-api.facebook.com:80/rtmp/{stream_key}?
Twitch
Streaming to Twitch requires some look up, but once set it'll work until you change your settings so that's pretty great as it allows you to use Automatic pushes. You'll need to look up two things: The recommended Twitch ingest server and your stream key.
Recommended twitch ingest server, this is most easily found here: Twitch ingest servers just pick one that works.
Stream key: This is found in your dashboard, never share it with anyone as they can hijack your channel with this. Obviously it'll be safe to fill into your stream target in MistServer, but make sure no one is watching while you're setting this up.
Once done your stream should look something like this:
rtmp://live-ams.twitch.tv/app/{stream_key}
The Amsterdam Twitch server has been chosen here as I'm located in The Netherlands, the {stream_key} part just needs to be replaced with whatever is given by Twitch at your dashboard panel. Once that's done you're all set.
Picarto
Streaming to Picarto is a little bit easier than Twitch as a single page contains all the information you need and unless you reset your stream key you'll be done.
Once you've chosen your ingest server and stream key it should look something like this:
rtmp://live.eu-west1.picarto.tv/golive/{stream_key}
I've chosen the Europe Picarto server for this example as I'm still in The Netherlands.
That's all for this blog post, I hope it makes it clear why and when you would want to use MistServer as a repushing server for other platforms and gives you a starting point in setting it up.
[News] MistServer and Intinor at NAB2018
We're happy to return for our second NAB show coming April. The MistServer team will available from 9-12 April at booth SU13808CM where we'll happily update you with our latest developments. If you're visiting the NAB please feel free to drop by at any time!
Joining us will be Intinor and together we'll be showing their Bifrost Reliable Transport (BRT), which optimizes live video via public internet by adding bonding to reliable transport. You can read more about and the technical paper here.
[Blog] What hardware do I need to run MistServer?
Hey everyone! A very common question we get is about the hardware requirements for MistServer. Like any good piece of software there is no "real" hardware requirement in order to use MistServer, but there is definitely a hardware requirement for what you want to achieve media streaming wise. We'll first give you the calculators and then explain all the main categories and the hows and why something was chosen.
The calculators
How do I decide on the hardware?
We tend to divide the hardware in 4 necessary categories: CPU, RAM, bandwidth and storage. Each category is important, but depending on your streaming media needs one might be more important than the other.
Processor (CPU)
The CPU is obviously important as it handles all the calculations/requests in your server. Luckily MistServer itself is not that demanding on your system. If you are running other applications aside from MistServer they will probably be more important for your processor choice than MistServer. As MistServer is heavily multi processed it does benefit from processors that can handle more threads or have more cores.
To give you something tangible: if you go to the cpubenchmark mega list every 3.4 points on CPU mark equals one viewer. For example the Intel Xeon E5-2679 v4 @ 2.50GHz comes with a CPU mark of 25236 and will be able to handle 7010 viewers at the same time.
Memory (RAM)
Memory gets some heavier use for media servers as memory is often used for temporary files such as stream data itself. This means it is often used for both incoming and outgoing streams and the required memory can raise quite rapidly. MistServer tries to get a handle on this by sharing the stream data between inputs, outputs and even different protocols when possible. Still, safest is to calculate the necessary memory for the absolute worst case scenario where memory cannot be shared at all!
To calculate the memory use in the worst case scenario when using MistServer you will require memory per viewer and the amount depends on the quality of your stream. MistServer needs roughly 12.5MB for every megabit of incoming stream bandwidth under the default MistServer settings. So obviously the more streams or stream tracks the more memory you need. On top of this comes a constant 2MB of memory necessary per active connection (either direction).
So if I assume 50 incoming streams of 2mbps and 600 viewers I will need: 12.5×2×50 = 725 MB + 2×650 = 2025MB. So roughly 2GB, now I would recommend a safety margin of at least 10% so going with at least 2.2GB would be wise.
Bandwidth (network)
Bandwidth is often the main bottleneck when it comes to streaming media, especially when higher qualities like 4K are used. Bandwidth is simply the amount of traffic your server can handle before the network connection is saturated. Once your network gets saturated it will mean users will have to wait for their data which often leads to a very bad viewer experience when it comes to media. So it is definitely one of the main things to avoid and thus necessary to calculate what you can handle.
Luckily this is quite easy to calculate, all you need is to know the stream quality and multiply this by every connection (both incoming and outgoing) for every stream you have or plan to have and add it together. Do note that even if a stream quality or stream itself is not viewed the incoming connection will still use up network bandwidth if it is pushed from an outside source, so do not neglect those streams.
For example if I got 6 streams, one of 1mbps, two of 2mbps and 2 of 5mbps with 50 viewers on the 1mbps, 300 viewers on 2mbps and 150 viewers on 5mbps I will need to be able to handle: 1mbps×(50+1)+2mbps×(300+2)+5mbps×(150+3) = 1568mbps. As you can see especially higher quality streams can cause this to raise rather fast, which is usually why a CDN or load balancer is used.
Storage (disk)
Storage is usually more easily understood, all you need is enough space to fit whatever streams you want to provide on demand or record. Especially with the price of storage compared to the other hardware requirements people tend to go a bit too far with their storage. It cannot hurt to have more though.
Storage is easily calculated, all you need to do is multiply the stream quality by the duration for every stream you have. The only thing you will want to pay attention to is that stream qualities are measured in bits while storage is measured in bytes. There are 8 bits in a byte, so the storage necessary is 8 times less than the bandwidth×duration.
Following the example of bandwidth if I got the same 6 streams, one of 1mbps and two of 2mbps and 5mbps and would want to record those all for 20 minutes I would need: (1×20×60+2×2×20×60+5×2×20×60) / 8 = 2250MB. So you would need a little over 2GB.
Calculate your own hardware requirements
Simply use the calculators at the start of this post and you should be good to go. Of course if You'd rather caculate manually use the formulas below.
Formulas to manually calculate
If you'd rather calculate by hand that's possible too. Just use the following formulas:
- CPU: 3.4×connections(viewers + incoming streams) = necessary cpubenchmark score
- Memory: 12.5×Stream_mbps×Streams_total + 2*Viewers = MB RAM
- Bandwidth: Average_stream_quality_mbps×(Input_streams + Viewers) = Bandwidth in Mbit
- Storage: Total_duration_of_recordings×Average_stream_quality_mbps / 8 = Storage in MByte
As a reminder the steps between kilo, mega and giga are 1024 not 1000 when we're measuring bits or bytes. So make sure you use 1024 when changing between the values or you will have a calculation error.
Well that was it for this blog post, I hope it helped you understand what kind of hardware you will need to search for when using MistServer. Our next blogpost will be done by Erik and will handle stream encryption.
[News] Introducing subscriptions
Hello everyone! We're happy to announce our shop now supports subscriptions.
When you select the subscription payment plan, you'll be charged for the first month. Then, when the month is up, a new license will automatically be created and paid for.
This means you will no longer have to worry about your licenses expiring.
You can cancel your subscription at any time. Your license will remain valid until its end date, but it will not be renewed and you will not be charged again.
If you currently have an active license and would like to subscribe from now on, you can click the Renew button from your Invoices overview and select the subscription payment plan. That will configure the cart to be filled with the settings of your previous order, starting at its end date.
If you have any questions or encounter any problems, please feel free to contact us.
[Blog] Setting up Analytics through Prometheus and Grafana
Hey Everyone! Balder here, this time I wanted to talk about using Prometheus and Grafana to set up analytics collection within MistServer. There’s actually quite a lot of statistics available and while we do tend to help our Enterprise customers to set this up it’s actually available for our non-commercial users as well and easily set up too.
Best practises for setting up your analytics server
As you might have guessed using Prometheus and Grafana will require some resources and we recommend running it on a different device than you are running MistServer on. This is for a few reasons, but the most important being that you would want your analytics collection to keep going if your MistServer instance goes dark for some reason or has run into trouble.
As such we would recommend setting up a server whose sole focus is to get the analytics from your MistServer instances. It can be any kind of server, just make sure it has access to all your MistServer instances.
Operating system choice
While this can be run in almost every operating system, a clear winner is Linux.
Under Linux both Prometheus and Grafana work with little effort and will become available as a service with their default installs. Mac comes in second as Prometheus works without too much trouble, but Grafana requires you to use the homebrew package manager for MacOS. Windows comes in last as I couldn’t get the binaries to work without a Linux simulator like Cygwin.
Installing Prometheus and Grafana
Linux
Installing both Prometheus and Grafana under linux is quite easy as they're both quite popular. There's a good chance they're both available as a standard package immediately. If not I recommend checking their websites to see how the installation would go for your Linux Operating System of choice.
Starting them once installed is done through your service system which is either:
systemctl start grafana.service
or
service grafana start
depending on your Operating system.
MacOS
Installing Prometheus can be done rather easy. The website provides Darwin binaries that should work on your Mac. It can also be installed through Homebrew which we will be using for Grafana. Which method you use is up to you, but I prefer to work with the binaries as it made using the configuration file easier for me.
Install Homebrew as instructed on their website.
Then use the following commands in a terminal:
brew update
brew install prometheus
Installing it as a service would be preferred, but I would recommend leaving that until after you've set everything up.
Installing Grafana can also be done through Homebrew. The Grafana website offers some excellent steps to follow in order to install it properly.
For Prometheus you will have to make your own service to have it automatically start on boot. Installing Grafana through Homebrew will make it available as a service through Homebrew.
Windows
Both Prometheus and Grafana offer Windows binaries, however I could not get them to work natively in Windows 10. They did instantly work when I tried running them in the Cygwin terminal.
Because of the added difficulty here I would just run them both in a Cygwin terminal and be done with it, though you could try to run them as a system service. The combination of Cygwin and Windows Services tend to cause odd behaviour however, so I can't exactly recommend it.
Setting up Prometheus and Grafana
01: Editing the Prometheus settings file
This is done by editing prometheus.yml, which may be stored on various locations. You will either find it in the folder you've unpacked, or when installed in Linux, at /etc/prometheus/prometheus.yml or /etc/prometheus.yml
You need to add the following to the scrape_configs:
scrape_configs:
  - job_name: 'mist'
    scrape_interval: 10s
    scrape_timeout: 10s
    metrics_path: '/PASSPHRASE'
    static_configs:
      - targets: ['HOST:4242']
To add multiple MistServers just keep adding targets with their respective HOST.
An example minimal prometheus.yml would be:
scrape_configs:
  - job_name: 'mist'
    scrape_interval: 10s
    scrape_timeout: 10s
    metrics_path: '/PASSPHRASE'
    static_configs:
      - targets: ['HOST01:4242', 'HOST02:4242', 'HOST03:4242']
We did notice that if there's a bad connection between your analytics server and a MistServer instance the scrape_timeout of 10 seconds could be too short and no data will be received. Setting a higher value for the scrape time could help in this scenario.
You can check if this all worked by checking out http://HOST:9090 at the machine you've set this up after you've started Prometheus. Within the Prometheus interface at Status → Targetsyou can inspect whether Prometheus can find all the MistServer instances you've included in your settings.
02: Starting Prometheus
For Linux
systemctl start prometheus.service
or
service prometheus start
or
Use a terminal to go to the folder where you have unpacked Prometheus and use:
./prometheus --config.file=prometheus.yml
For MacOS
Use a terminal and browse to the folder where you have unpacked Prometheus. Then use:
./prometheus --config.file=prometheus.yml
For Windows
Use a command window to browse to the folder where you have unpacked Prometheus. Then use:
prometheus.exe --config.file=prometheus.yml
03: Setting up Grafana
Through your installation method Grafana should be active and available as a service, or if you are using Windows you will need to boot Grafana by starting grafana-server.exe.
Once active Grafana will have an interface available at http://HOST:3000 by default. Open this in a browser and get started on setting up Grafana.
Adding a data source
The next step is to add a data source. As we're running Grafana and Prometheus in the same location, this is quite easy. All we need to set is the Name, Type and URL all other settings will be fine by default.
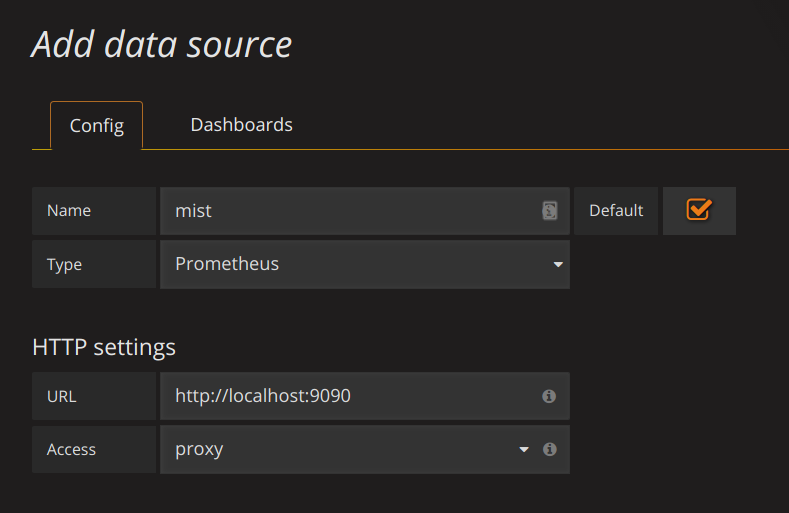
Namecan be anything you'd want.Typehas to be set to:PrometheusURLwill be the location of the Prometheus interface:http://localhost:9090
Add those and you're ready for the next step.
Adding the dashboard
We've got a few Dashboards available immediately which should give the most basic things you'd want. You can add a dashboard by following these steps:
Click on the grafana icon in the top left corner → hover Dashboards → SelectImport`.
You should see the following
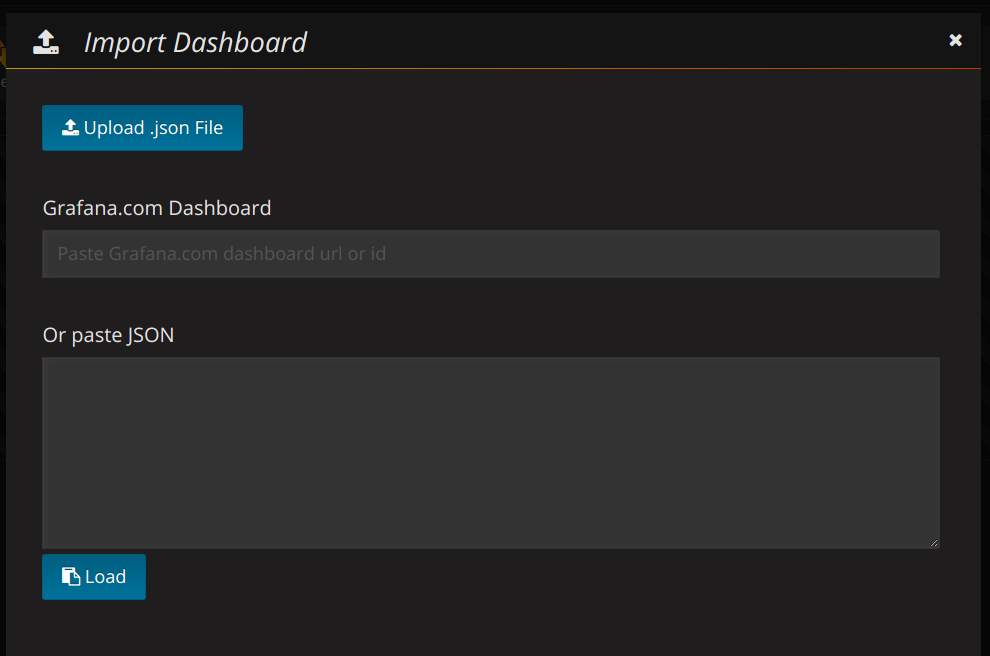
Fill in the Grafana.com Dashboard number with our preset dashboards (for example our MistServer Vitals: 1096)
If recognised you will see the following
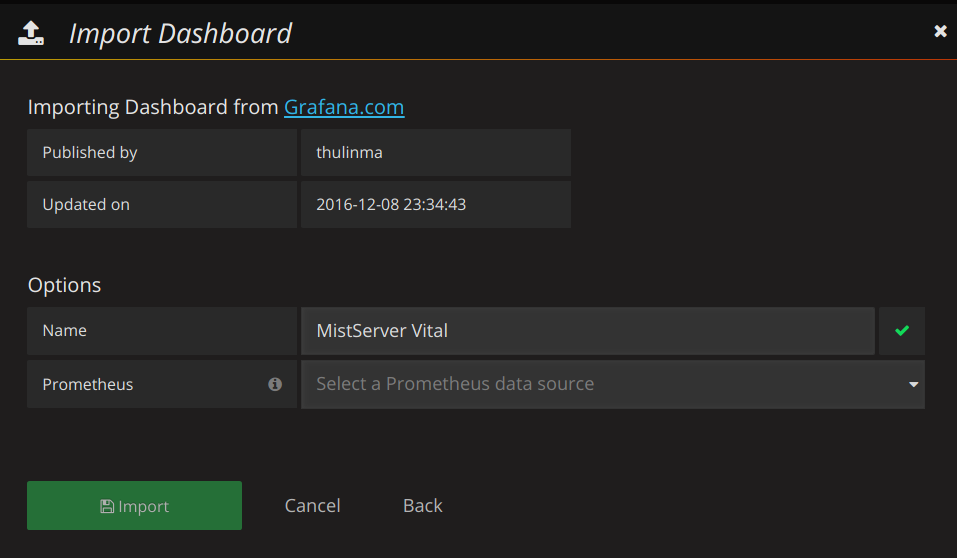
Just add that and you should have your first basic dashboard. Our other dashboards can be added in the same manner. More information about what each dashboard is for can be found below.
MistServer provided dashboards
All of the dashboards can be found here on Grafana Labs as well.
MistServer Vitals: 1096
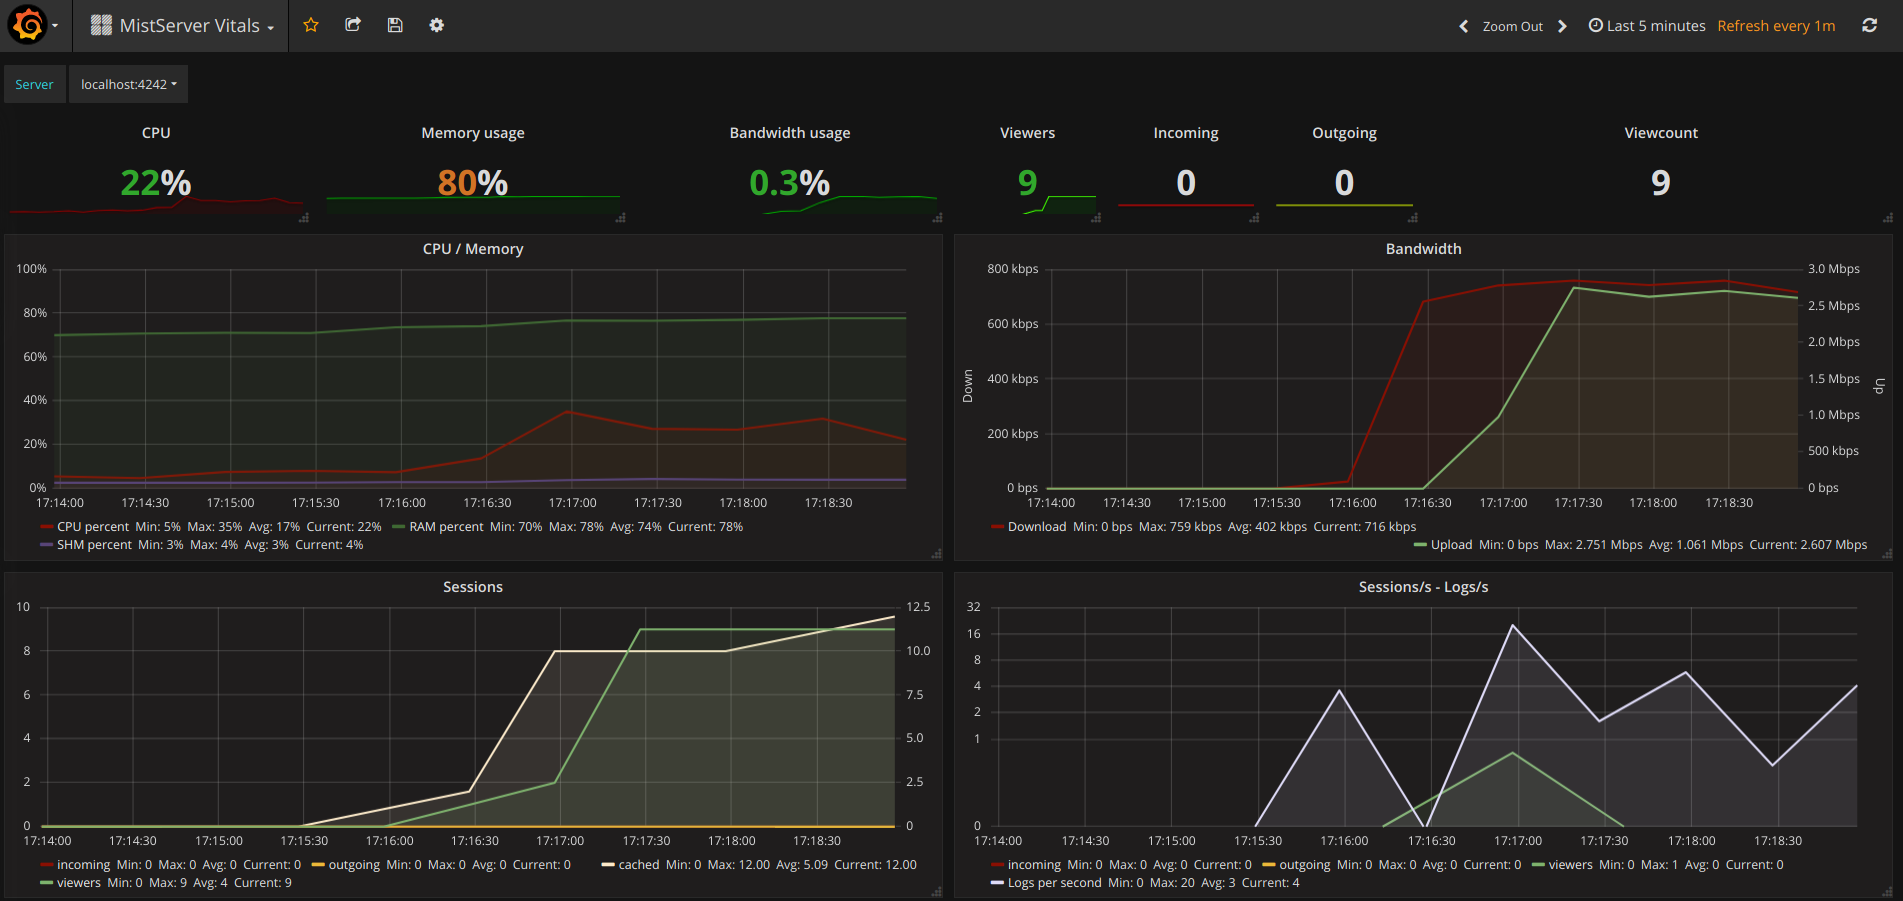
This is our most basic overview which includes pretty much all of the statistics you should want to see anyway. It covers how your server is doing resource and bandwidth wise.
You switch between given MistServers at the top of given panels by clicking and selecting the server you want to inspect.
MistServer Stream Details: 4526
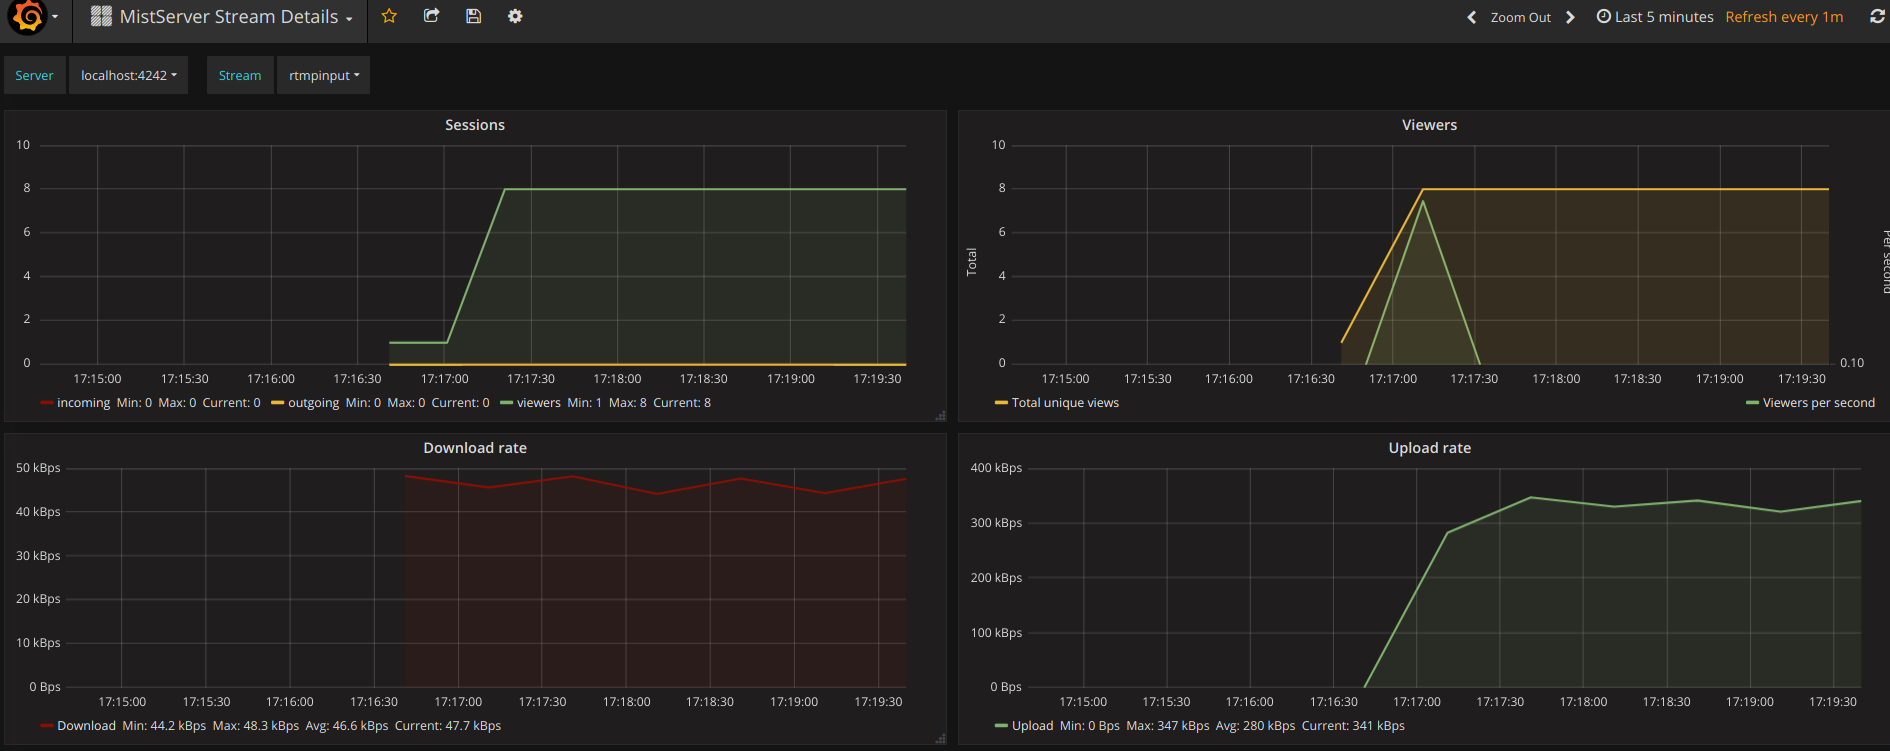
This shows generic details per active stream. Streams and Servers are selected at the top of the panel. You'll be able to see the amount of viewers, total bandwidth use and amount of log messages generated by the stream.
MistServer All Streams Details: 4529
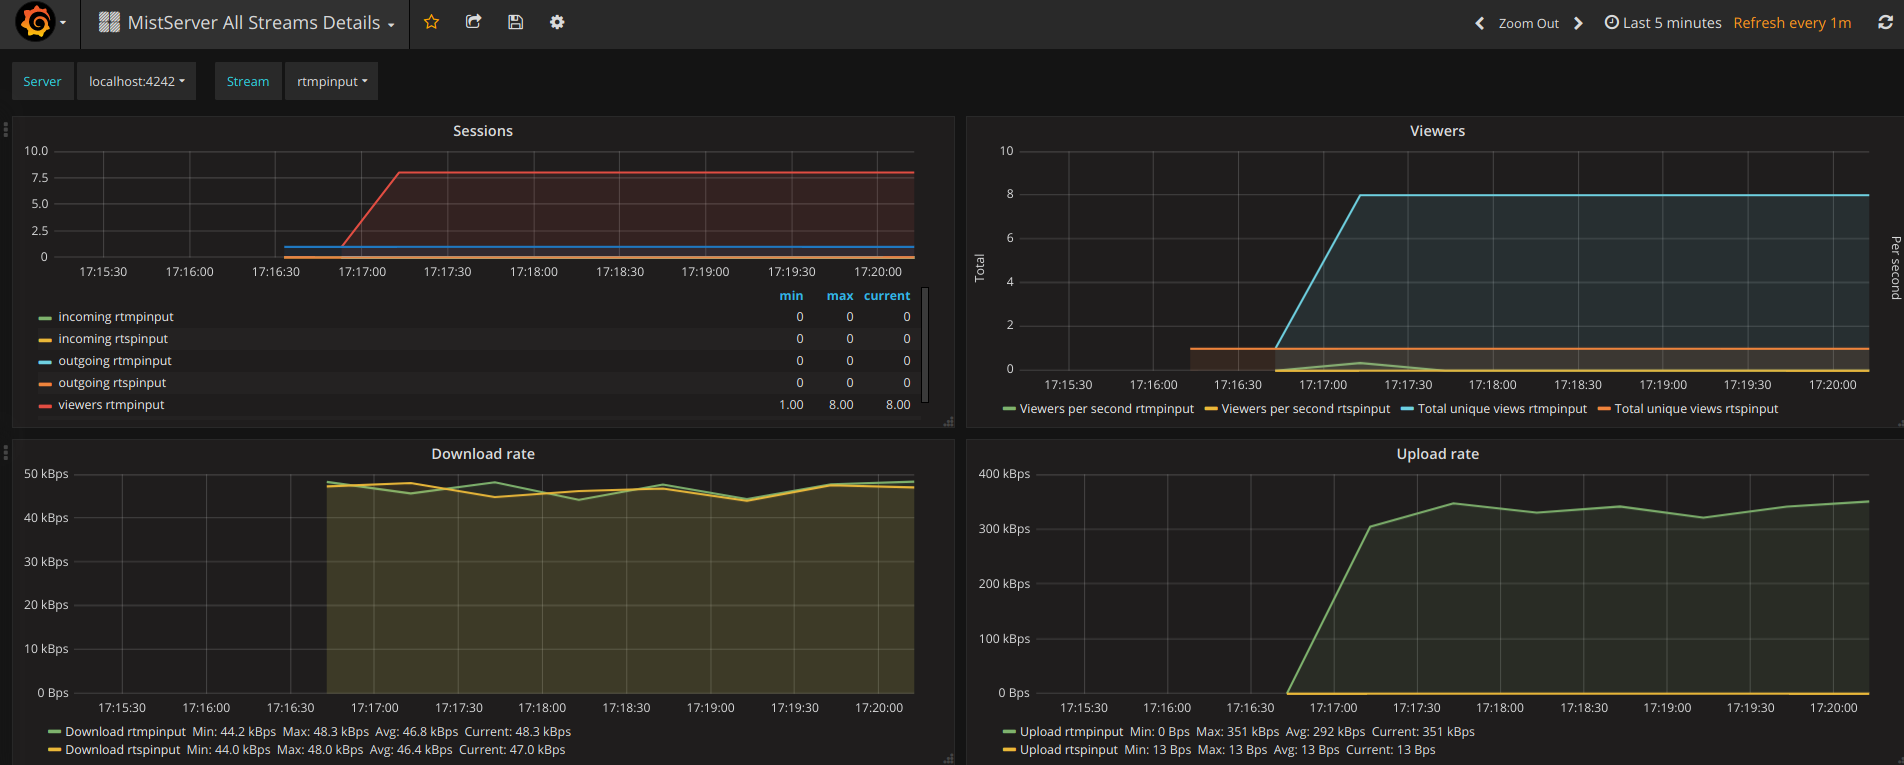
This shows the same details as the MistServer Stream Details Dashboard, but for all streams at the same time. This can be quite a lot of data, and will become unusable if you have a lot of streams. If you have a low amount of streams per server this gives an easy to use overview however.
Well that's it for this blogpost, I hope it's enough to get most of you started on using Prometheus and Grafana in combination with MistServer.
[Blog] Metadata format
Hello readers, this is Erik, and today we are going to be diving in-depth into some important updates we have been making to our internal metadata systems and communication handling.
Over the last couple of years "low latency" streaming has become more and more important, with viewers no longer accepting long buffering times or being delayed in their stream in any way. To achieve this all processes in your ecosystem will need to be able to work with the lowest latency possible, and having a media server that aids in this aspect is a large step in the right direction.
With this in mind we have been working on creating a new internal format for storing metadata, that allows multiple processes to read while having a single source process generate and register the incoming data. By doing this directly in memory we can now bring our internal latency down to 2 frames direct throughput, and this post is an overview of how we do this.
Communication in a modular system
Because MistServer is a multi-process environment - a separate binary is started for each and every viewer - efficiency is mostly dependent on the amount of overhead induced by the communication between the various processes. Our very first version used a connection between each output and a corresponding input, which has been replaced a couple of years ago by a technique called shared memory.
Shared memory is a technique where multiple processes - distributed over any number of executables - can access the same block of memory. By using this technique to distribute data, all source processes need to only write their data once, allowing any output process to read it simultaneously.
The main delaying factor in its current implementation, is that the metadata for a live stream only gets written to memory every second. As all output processes read once per second as well, this yields a communication delay of up to 2 seconds.
For our live streams we also have the additional use case where multiple source processes can be used for a single stream in order to generate a multi bitrate output. All source processes write their own data to memory pages and a separate MistInBuffer process handles the communication, authorization and negotiation of all tracks. Next to this it will make sure DVR constraints are met, and inactive tracks get removed from the stream.
During this it will parse the data written to a page by a source process, only to regenerate the metadata that was already available in the source to begin with. This in itself adds a delay as well, and moreover it demands processing power to recalculate information that was already known.
Synchronisation locks
To make matters worse, in order to maintain an up to date view on all data, all executables involved in this system will need to 'lock' the metadata page in its entirety to make sure it is the only process with access. Though the duration of this lock is generally measured in fractions of milliseconds, having a stream with hundreds or thousands of viewers at the same time does put a strain on keeping output in realtime.
Reliable Access
For the last couple of months we have been busy with a rework of this structure to improve our metadata handling. By using the new RelAccX structure we can generate a lock-less system based on records with fixed-size data fields.
If the field sizes do need to be changed a reload of the entire page can be forced to reset the header fields. By doing so all processes that reload the structure afterwards will be working with the new values, as these are stored in a structured header. This also allows us to add fields and maintain consistency going forward.
About latency
By using the above described structure we can assign a single page per incoming track, and make the source process write its updates to the same structure that is immediately available for all other processes as well. By setting the 'available' flag after writing all data, we can make sure that the data on the page matches the generated metadata. By doing this we have measured a latency of 2 frames end-to-end in our test environment.
In the same way we can set a record to 'unavailable' to indicate that while the corresponding data might actually still exist at the moment, it is considered an unstable part of the stream and will be removed from the buffer in the near future.
Communications
Besides having implemented this technique for the metadata, we have also upgraded the stability and speed of our internal communications. The key advantages here are that our statistics API can now give even more accurate data, and that output processes can now select any number of tracks from a source up from the previous limit of 10 simultaneous tracks - yes we have had customers reaching this limitation with their projects.
Conclusion
By updating the way we have structured our internal communications, we have been able to nearly remove all latency from the system, as well as attaining a reduced resource usage due to not having to recalculate 'known' data. This system will be added in our next release, requiring a full restart of the system. If you have any question on how to handle the downtime generated by this, or about the new way we handle things, feel free to contact us
[Blog] Using MistServer through a reverse proxy
Sometimes, it can be convenient to direct requests to MistServer through a reverse proxy, for example to limit the amount of ports that will be used, to use a prettier url or even to change the requests through the proxy.
In this blog, I'll take you through the steps to configure your web server and MistServer to work with this. For this example I'll consider the use case of having an existing website that is running on port 80, with MistServer on the same machine, and that we want MistServer's HTTP endpoint (by default that's port 8080) to be reached through http://example.com/mistserver/.
Using a reverse proxy for MistServer does have a cost to efficiency, however.
Using this method means that instead of once, output data needs to be moved four times. Furthermore, MistServer tries to reuse connections, but the proxy can mix these connections making it unusable for MistServer.
Things to keep in mind
If you are using a different HTTP port for MistServer replace any
8080with the port number you use for HTTP within MistServerIf you would like to change the url pathing to something else than
/mistserver/http://example/mistserver/change the/mistserver/part to whatever you want.If you see
example.comyou are supposed to fill in your server address
Configure your web server
Note for MistServer users below version 2.18 MistServer versions 2.17 and under do not work with the "X-Mst-Path" header and will need to set their public address manually in the steps later on. For users that use MistServer 2.18 and later: You will not need to set a public address as MistServer will be able to use the "X-Mst-Path" to automatically detect and use the proxy forward. Keep in mind however that the embed code cannot be aware of the "X-Mst-Path" header, so to make things easier for yourself you will most likely want to set the public address anyway.
The first step is to configure your web server to reverse proxy to MistServer's HTTP port.
For Apache:
Enable the mod_proxy and mod_proxy_http modules and add the following to your configuration file:
<Location "/mistserver/">
  ProxyPass "ws://localhost:8080/"
  RequestHeader set X-Mst-Path "expr=%{REQUEST_SCHEME}://%{SERVER_NAME}:%{SERVER_PORT}/mistserver/"
</Location>
note for Apache Apache 2.4.10 or higher is required for this configuration to work. Websocket support in Apache versions below 2.4.47 requires adding the proxy_wstunnel module. ProxyPass is only set to "ws://localhost:8080/" because it will default back to http if the websocket fails. So it will actually do what you want.
For Nginx:
Add the following to your configuration's server block, or nested into your website's location block:
location /mistserver/ {
  proxy_pass http://localhost:8080/;
  proxy_set_header X-Real-IP $remote_addr;
  proxy_buffering off;
  proxy_http_version 1.1;
  proxy_set_header Upgrade $http_upgrade;
  proxy_set_header Connection "Upgrade";
  proxy_read_timeout 600s;
  proxy_set_header Host $host;
  proxy_set_header X-Mst-Path "$scheme://$host/mistserver";
}
For Lighttpd:
Add mod_proxy to your list of server modules, or add the following to your configuration file:
server.modules = ("mod_proxy")
Also, to disable response buffering, add:
server.stream-response-body = 2
and for the reverse proxy itself:
$HTTP["url"] =~ "(^/mistserver/)" {
  proxy.server  = ( "" => ( "" => ( "host" => "127.0.0.1", "port" => 8080 )))
  proxy.header = ( "map-urlpath" => ( "/mistserver/" => "/" ),"upgrade" => "enable")
}
Note for Lighttpd There is no easy way to include a custom HTTP header like "X-Mst-Path". You will need to make configurations within MistServer as well to get the forwarding to work!
Configure MistServer
MistServer also outputs information about its streams, including the various urls under which the stream can be accessed. However, if reverse proxying is being used, these urls cannot be accessed externally. That can be fixed by configuring the "Public address"-setting of the HTTP protocol through the MistServer Management Interface.
While this step could be skipped if you're using Apache or Nginx we would still recommend setting it up. The MistServer interface has no way of knowing it is also available over any address within the reverse proxy. The public address is meant to be used so the interface does know and can properly use them in both the preview and embed panels.
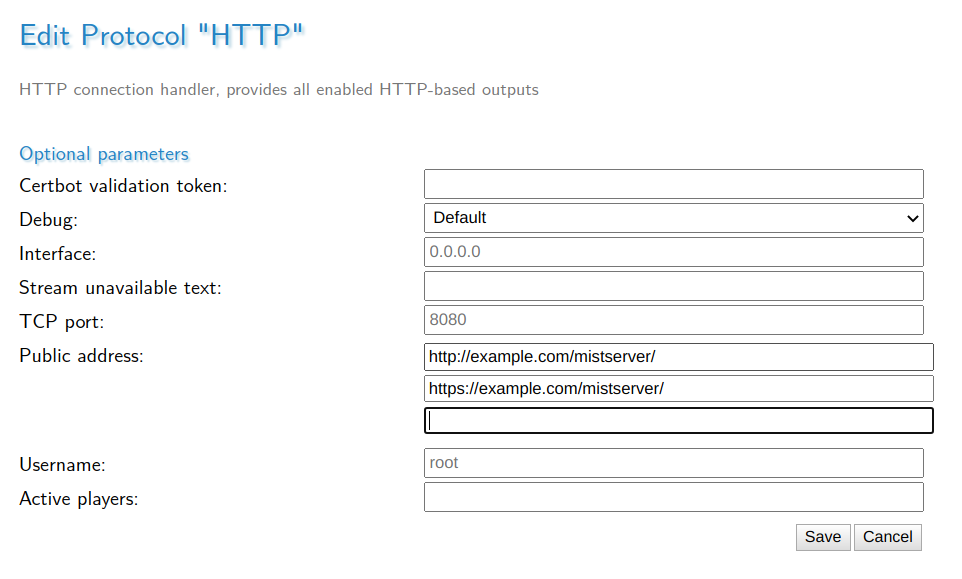
You should now also be able to watch your stream at http://example.com/mistserver/STREAMNAME.html.
Enabling SSL
For Apache and Nginx all you need to do is enable SSL support within Nginx or Apache and you are done. Requests over HTTPS are automatically forwarded over HTTPS thanks to X-Mst-Path.
For Lighttpd You will need to enable SSL and you will also need to include the HTTPS address in the public url like in the example above.
Edit your web pages
Lastly, the urls with which streams are embedded on your webpage will need to be updated. If you are using MistServer's embed code, update any urls. There are only two places that need changing, it's the bits with STREAMNAME.html and player.js. If you have set a public address the embed code will use this address as well. Though only the first filled in public address will be used by the embed code MistServer will assume it is available on all filled in addresses.
<div class="mistvideo" id="nVyzrqZSm7PJ">
  <noscript>
    <a href="//example.com/mistserver/STREAMNAME.html" target="_blank">
      Click here to play this video
    </a>
  </noscript>
  <script>
    var a = function(){
      mistPlay("STREAMNAME",{
        target: document.getElementById("nVyzrqZSm7PJ")
      });
    };
    if (!window.mistplayers) {
      var p = document.createElement("script");
      p.src = "//example.com/mistserver/player.js"
      document.head.appendChild(p);
      p.onload = a;
    }
    else { a(); }
  </script>
</div>
We're using //example.com/mistserver/ here as for both HTTP and HTTPS the default ports are used. This setup allows us to use this embed code for both HTTP and HTTPS pages as it will adapt to the scheme used by the viewer. Note that we're talking about the ports the proxy forward is using, not the HTTP or HTTPS ports setup within MistServer.
If the proxy is using non-default HTTP or HTTPS ports you would have to use the full addres + port in the url, for example if HTTPS was running on 4433: https://example.com:4433/mistserver/.
That's all folks! Your website should now access MistServer through the reversed proxy. For both HTTP and HTTPS.